Dashlane Password Manager Review 2025
In the digital age, passwords are the gatekeepers to our online lives, protecting our valuable information from prying eyes. However, managing and securing multiple passwords can quickly become overwhelming. That’s where Dashlane, a leading password manager, comes to the rescue. In this review, we will dive into the world of Dashlane and explore how it simplifies password management, enhances security, and provides a seamless online experience. Join us on this journey as we uncover the features, benefits, and user experience that make Dashlane stand out in the crowded field of password management solutions.
Subscription model
|
PARAMETERS |
FREE |
PREMIUM |
FAMILY |
|
Cost (Monthly) |
$0 |
$4.99 |
$7.49 |
|
No of Password Vaults |
1 |
1 |
Up to 6 |
|
No of Devices |
1 |
Unlimited |
Unlimited |
|
Password Storage |
Up to 50 Passwords |
Unlimited Passwords |
Unlimited Passwords |
|
Dark Web Monitoring |
– |
Up to 5 email addresses |
Up to 5 email addresses per user |
|
Share Passwords |
Up to 5 Accounts |
Unlimited |
Unlimited |
|
Password Generator |
Yes |
Yes |
Yes |
|
Password Health Checker |
Yes |
Yes |
Yes |
|
Form & Payment Autofill |
Yes |
Yes |
Yes |
|
VPN for WiFi Protection |
– |
Yes |
Yes |
|
Secure Notes |
– |
Yes |
Yes |
|
Encrypted File Storage |
– |
1 GB |
1 GB |
Performance at Glance
Here is valuable insight into the performance and reliability ratings of Dashlane, allowing you to make informed decisions.
|
SPECIFICATIONS |
DASHLANE STAR RATING AT GLANCE |
OUR VERDICT |
|
Ease of Use |
|
Dashlane is easy to use due to its intuitive interface and easy setup process. |
|
Security |
|
Dashlane comes with strong encryption and additional security features like two-factor authentication and breach alerts. |
|
Pricing |
|
Pricing is mostly on the higher end, but it offers a free plan and a variety of paid plans with additional features for different needs. |
|
Features |
|
Dashlane offers a wide range of features, including password management, autofill, secure notes, a password generator, and additional security features like two-factor authentication and breach alerts. |
|
Support |
|
Dashlane offers good customer support through email, phone, and chat, as well as a robust help center with detailed guides and resources. |
|
G2 Rating |
|
G2 has over 1200 reviews, indicating a generally positive reception from users. |
Features Of Dashlane Software Manager
Dashlane Password Manager offers a range of important features that make it a popular choice for password management and online security.
|
FEATURES |
DASHLANE PASSWORD GENERATOR |
|
Local Storage Option |
Yes |
|
Two-Factor Authentication |
Yes |
|
Failsafe Function |
Yes |
|
Password Generator Function |
Yes |
|
Help Instructions |
Yes |
|
Email Support |
Yes |
|
Live Chat Support |
Yes |
|
Phone Support |
No |
|
Quick Login |
Yes |
|
Browser Extension |
Yes |
|
Mobile App |
Yes |
|
Multi-Device Use |
Yes |
|
Admin Management |
Yes |
|
Security Audits |
Yes |
|
Digital Wallet |
Yes |
What Is A Password Manager?
A password manager is a software designed to create, store, and automatically fill in robust passwords and other frequently used details, such as credit card numbers. By using a password manager, you only have to recall one master password to access your securely encrypted digital vault.
While common browsers may have a basic built-in password manager, it’s essential to choose a top-notch, external password management application that offers advanced features like VPN, encryption, and 2-factor authentication. These added security measures ensure stronger protection and greater convenience.
What Are The Benefits Of Using Dashlane?
Dashlane offers a wide array of benefits that cater to both individual users and businesses. Let’s have a look at of the benefits:
-
Save Time with Dashlane Autofill:
Dashlane’s Autofill feature is designed to save you time and streamline your online activities. Instead of manually typing in your login credentials for various websites and apps, Dashlane automatically fills in the information for you. This not only saves time but also reduces the chance of making errors while logging in. Whether it’s social media accounts, online shopping, or banking portals, Dashlane’s Autofill makes the process quick and hassle-free.
-
Protect Your Business:
For businesses, Dashlane provides essential security features to protect sensitive information and user credentials. With strong password generation and management tools, Dashlane ensures that employees use secure and unique passwords for their accounts. Additionally, the admin management feature allows businesses to control access and permissions, enhancing data security within the organization.
-
Share Securely:
Sharing passwords is sometimes necessary for collaboration, but it can also be risky if not done securely. Dashlane offers a safe and encrypted way to share passwords and sensitive information with colleagues and team members. By using Dashlane’s password-sharing tool, you can send passwords and Secure Notes to other Dashlane users, ensuring that critical information remains protected.
-
Retain Privacy with Smart Spaces:
Dashlane’s Smart Spaces feature allows you to create separate virtual spaces for different aspects of your life. For example, you can have a personal Smart Space and a work-related Smart Space, each with distinct sets of passwords and credentials. This separation ensures privacy and organization, making it easier to manage your digital life while maintaining security.
How To Add A New Login To Dashlane?
When it comes to adding new logins to your account, Dashlane provides you with three convenient methods:
-
Importing Logins:
Dashlane allows you to easily import your existing logins from various sources. Whether you have passwords saved in a web browser, another password manager, or stored as a file, Dashlane’s import feature simplifies the process. By securely transferring your logins into Dashlane, you can centralize and manage all your passwords in one place.
-
Adding Logins As You Browse:
Dashlane streamlines the login creation process while you browse the web. With its browser extension, you can effortlessly capture new login credentials as you sign up or log in to different websites. Dashlane automatically saves the details for future use, ensuring a seamless and hassle-free experience when accessing those accounts later.
-
Adding Logins One at a Time:
For situations where you need to manually add logins, Dashlane offers a straightforward option to enter login information individually. By inputting the required details, such as username and password, you can quickly create new logins within Dashlane’s interface.
Once you have added your logins to Dashlane, you unlock the benefits of a more convenient and secure online experience. Dashlane’s Autofill feature eliminates the need to remember and type passwords for each account. With just one click, Dashlane can automatically log you into your various accounts, saving you time and effort.
How To Add Bank Account Information To Dashlane?
Dashlane offers you the convenience of adding and securely storing various payment methods, including credit and debit cards, PayPal information, and bank accounts. By storing these payment methods in your encrypted vault, you can rest assured that your sensitive financial information remains safe. Let’s get started
Adding Payment Information
For Web
To add your payment information, follow these simple steps using the Dashlane web app:
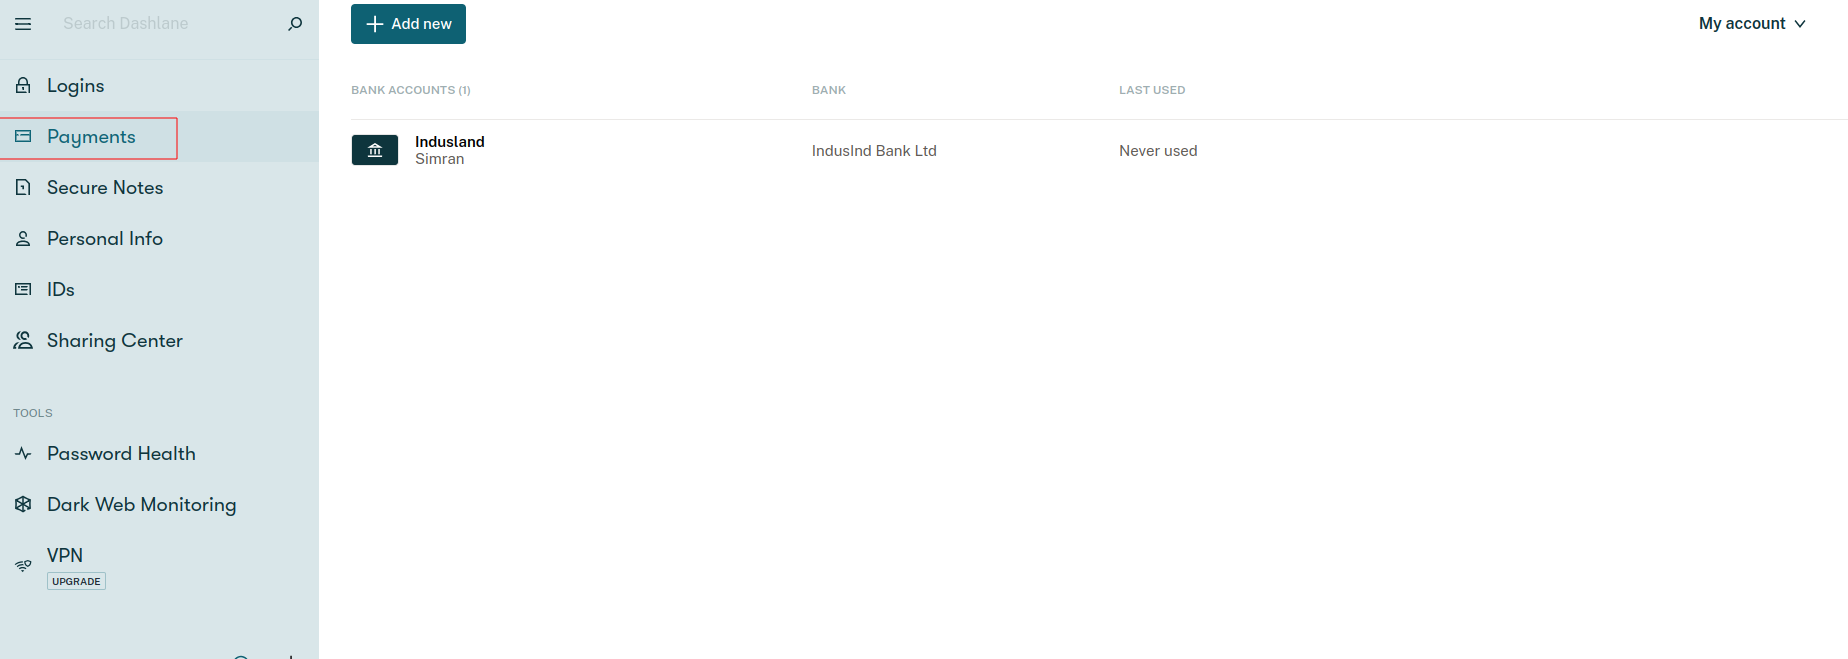
- Access The Payments Section:
Open the Dashlane web app and navigate to the Payments section.
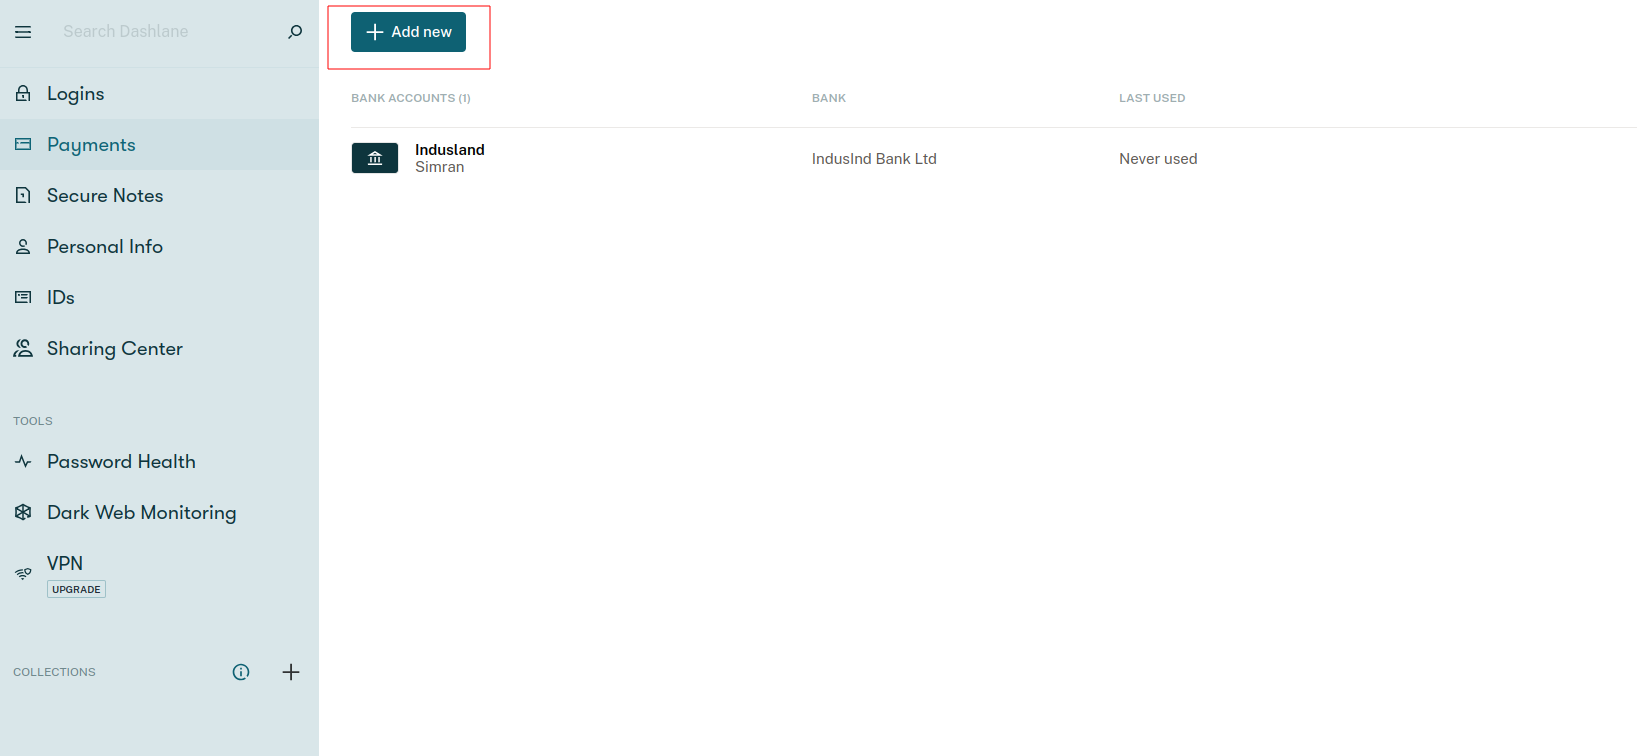
- Add A New Payment Method:
Click on “Add new” and choose the type of card or account you wish to add.
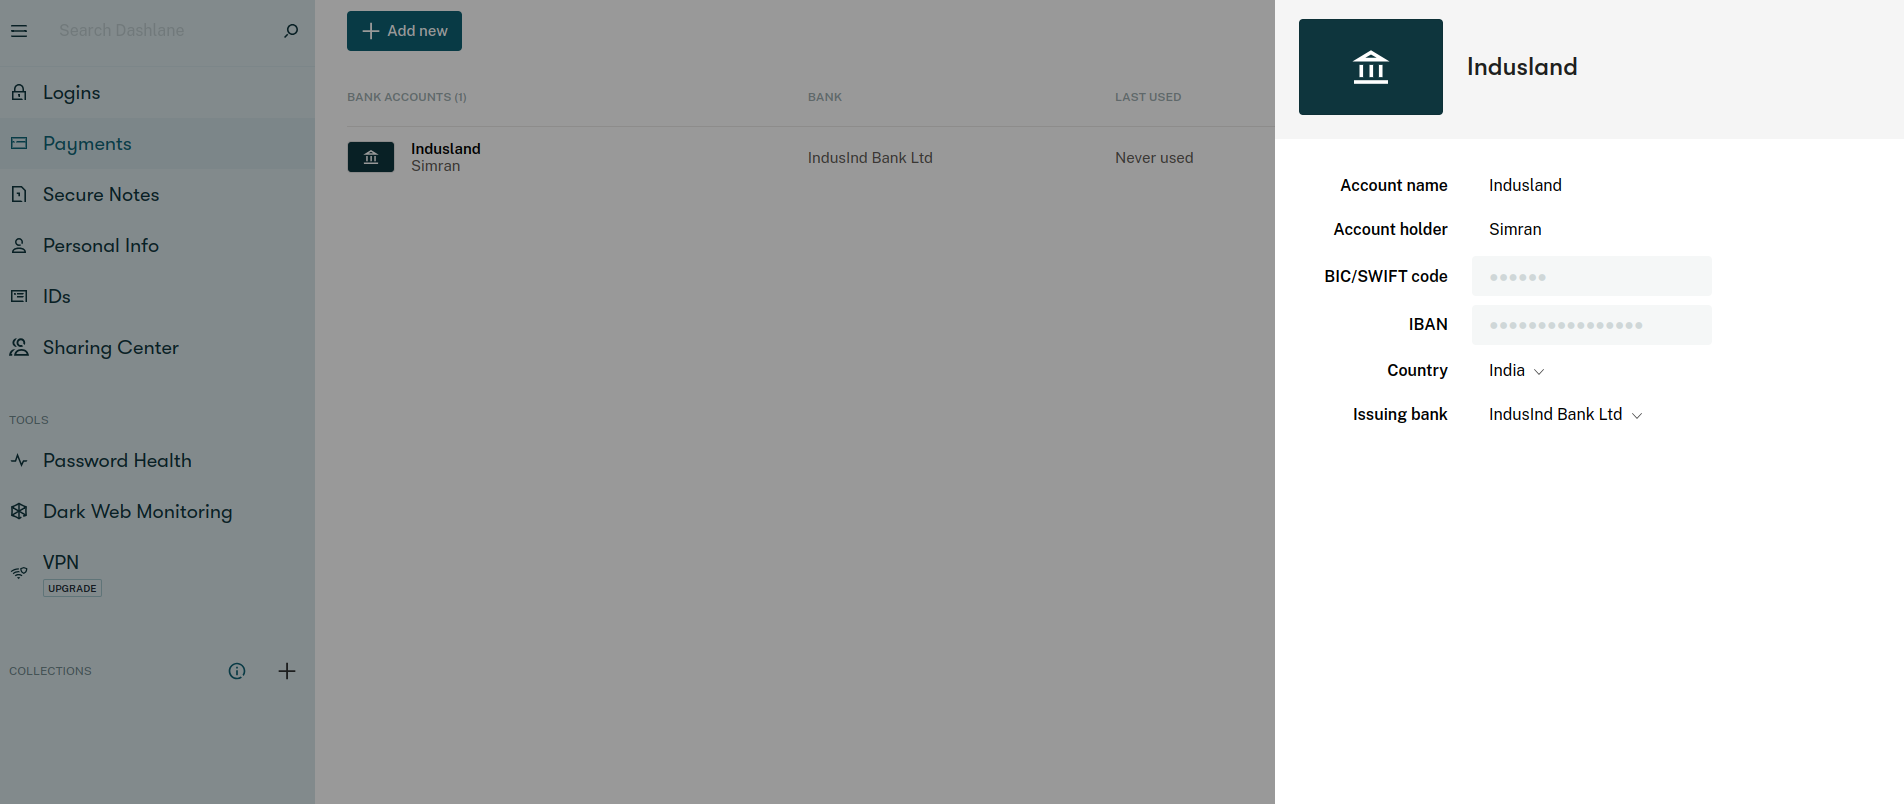
- Enter Your Payment Details:
Provide the necessary payment information as required.
- Optional Details:
If desired, you can include additional information like your PIN or billing address in the Notes section.
- Customize Your Card (Optional):
For easy identification, you have the option to choose or edit the color associated with your card. This color will appear alongside the card icon, which is especially useful when managing multiple cards.
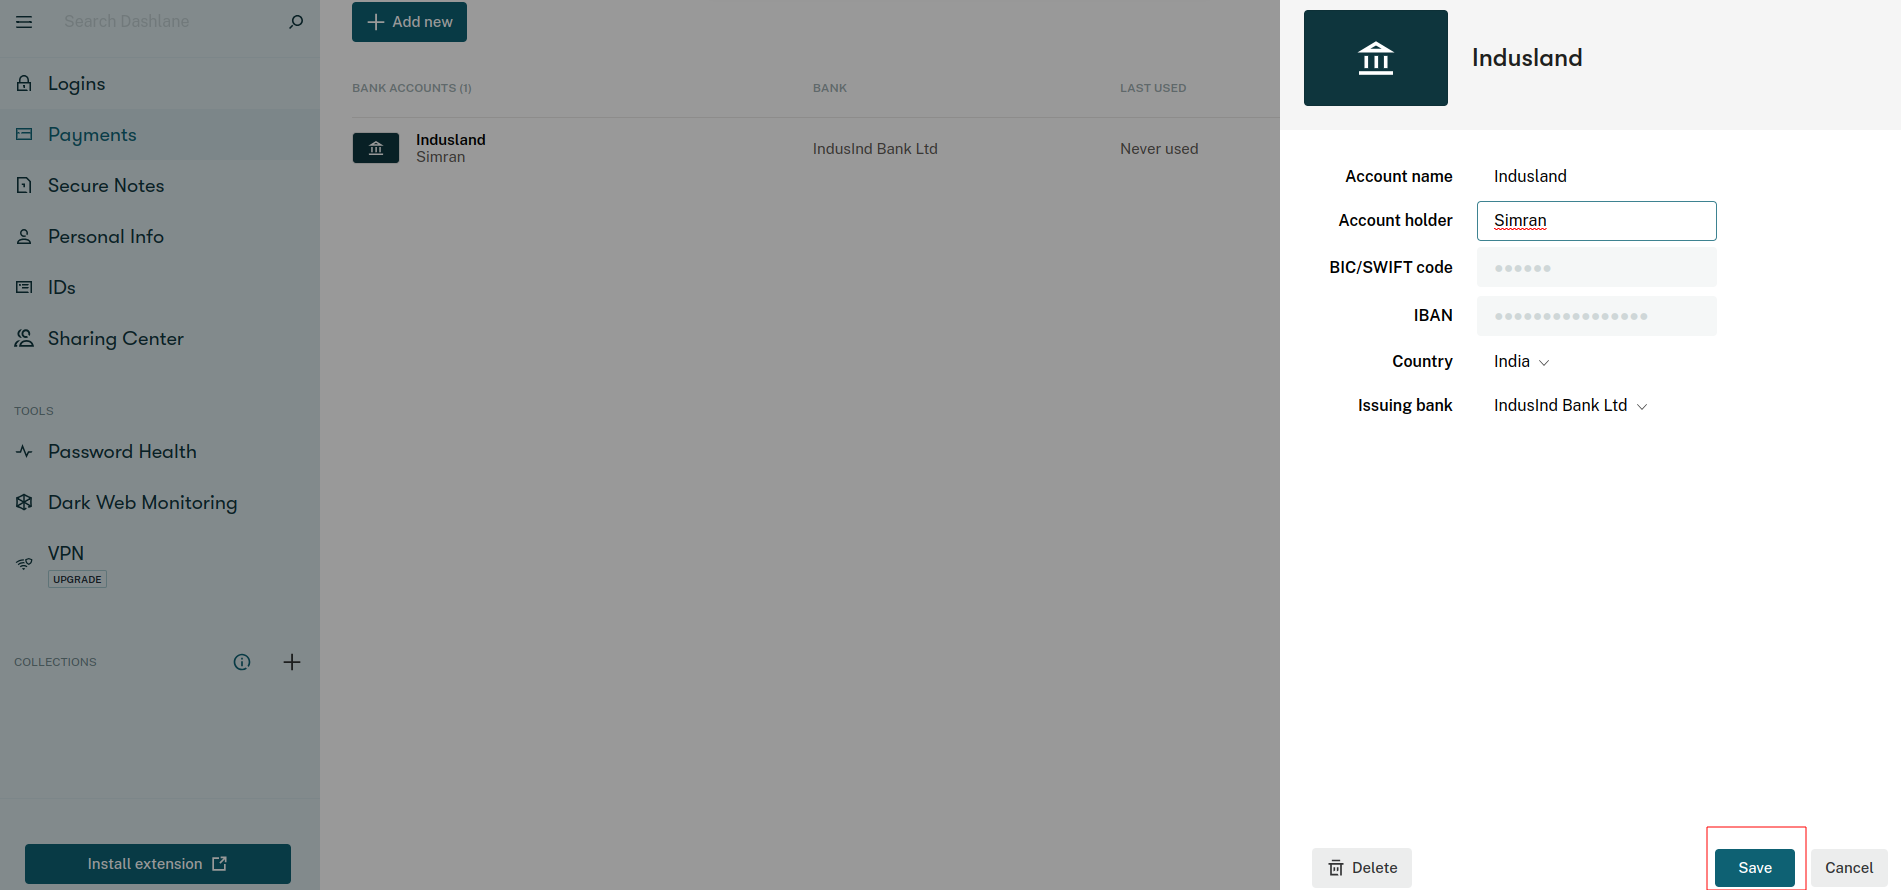
- Save Your Changes:
Once you’ve entered the details and customized the card, click on “Save” to store your payment information securely in your Dashlane vault.
Accessing your payment information via the Dashlane extension is just as straightforward:
- Launch The Dashlane Extension:
Click on the Dashlane D icon located in your browser toolbar.

- Navigate To Payments:
From the extension menu, select “Payments” to view your stored payment me
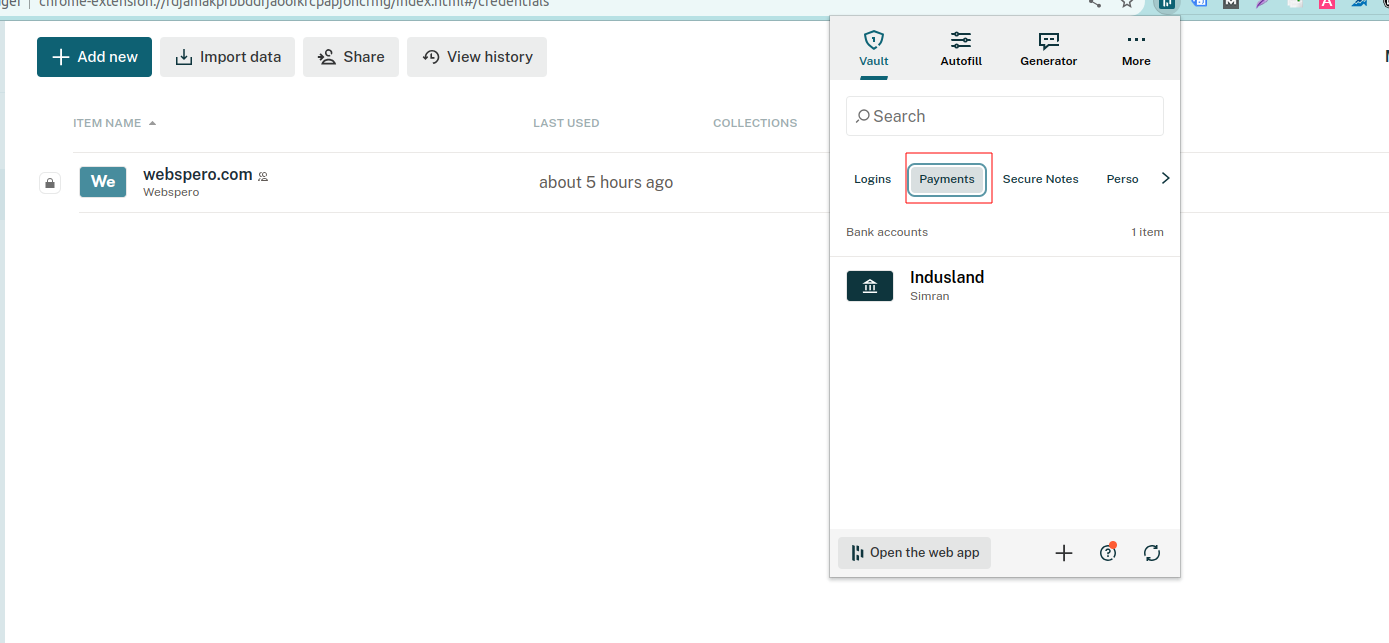
- Adding New Payment Methods:
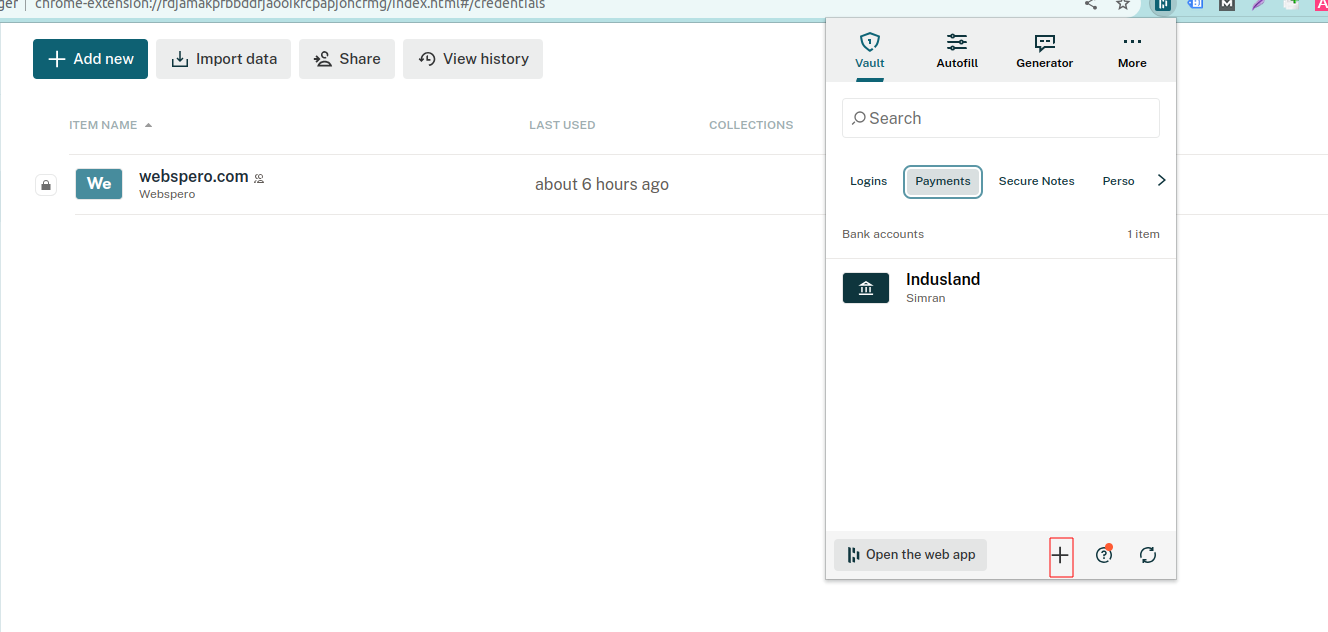
While you can’t directly add a payment method in the extension, you can click on the plus (+) icon, which will redirect you to the Dashlane web app. There, you can easily add any new payment methods.
For Android
In the Dashlane Android app, adding payment types is a breeze. With the convenience of Android’s near-field communication (NFC) technology, you can swiftly add most credit and debit cards to Dashlane with just a tap.
Here’s how you can do it on a Samsung device:
- Access Payments:
Navigate to the Home screen of the Dashlane Android app and tap on “Payments” in the navigation bar.
- Add A New Payment Type:
Select “+Add new” and choose the type of payment method you want to add, whether it’s a Credit/Debit Card, PayPal, or Bank account.
- Effortless NFC Autofill (For Credit/Debit Cards):
If you are adding a credit or debit card and have NFC enabled, you can simply hold your card to the back of your device. Dashlane will automatically detect the card details through NFC and autofill the necessary information for you.
- Add Optional Details:
In the Notes section, you have the flexibility to include additional information like your PIN or billing address if needed. Moreover, you can choose to add an address from the Personal info section of Dashlane by selecting “Address.”
- Customizing Your Card (Optional):
To easily distinguish between multiple cards, you have the option to choose the color for your card. Simply select the droplet icon and pick your preferred color, which will then be associated with the card icon.
- Save Your Payment Method:
Once you have entered all the required information and customized the card, click on the checkmark icon to save the item securely in Dashlane.
For iOS Apps
To add a new payment method to Dashlane, follow these simple steps:
- Access Payments:
From the Home screen, navigate to the Payments section.
- Select The Plus (+) Icon:
Look for the plus symbol and click on it.
- Choose “Add Payment”:
From the options presented, select “Add payment.”
- Select The Payment Type:
Choose the specific type of payment method you wish to add, such as Credit/Debit Card, PayPal, or Bank account.
- Enter The Necessary Details:
Provide all the relevant information required for the selected payment method.
- Save Your Changes:
Once you have entered the details, click on “Save” to securely store the new payment method in your Dashlane vault.
Editing The Payment Information
For Web
To make edits to your payment information using the Dashlane web app, follow these simple steps:
- Access The Payments Section:
Navigate to the Payments section within the Dashlane web app.
- Choose The Payment Method To Edit:
Select the specific card or account that you want to make changes to.
- Directly Edit Non-Sensitive Information:
You can easily modify details like your name or the item name directly within the web app.
- Edit Sensitive Information Securely:
For more sensitive information, such as your card number, account number, or three-digit security code, click on “Show” next to the field you wish to edit. This will ensure that any sensitive data is handled securely.
- Optional Details:
In the Notes section, you have the option to add extra information, such as your PIN or billing address, if needed.
- Enter Your Master Password:
To safeguard your changes, the system may prompt you to enter your Master Password for verification.
- Complete The Editing Process:
After you’ve made the necessary edits, click on “Close” to finalize the changes and securely update your payment information in the Dashlane vault.
When accessing your payment information through the Dashlane extension, the process is as follows:
- Open The Dashlane Extension:
Click on the Dashlane D icon situated in your browser toolbar.
- Go To Payments:
From the extension menu, select “Payments” to view your stored payment methods.
- Making Edits:
While you cannot directly make edits in the extension, you can click on the pencil icon associated with the payment method you wish to modify. This will automatically take you to the Dashlane web app, where you can make the necessary changes securely.
For Android
In the Dashlane Android app, editing payment types is a straightforward process. Thanks to Android’s near-field communication (NFC) technology, you can effortlessly update most credit and debit card information directly within Dashlane.
Here’s how you can do it on a Samsung device:
- Access Payments:
Start by navigating to the Payments section within the Dashlane Android app.
- Choose The Payment Method To Edit:
Select the card or account that you want to make changes to.
- Use The Pencil Icon To Edit:
To begin editing, simply tap on the pencil icon, which allows you to make modifications to the selected payment method.
- Swift NFC Autofill (For Credit/Debit Cards):
If you are editing a credit or debit card and have NFC enabled, you have the option to hold your card to the back of your device. Dashlane will automatically detect the card details through NFC and autofill the relevant information for you, saving you time and effort.
- View And Edit Hidden Information:
Should you wish to view or edit hidden information, such as your card number, account number, or three-digit security code, you can easily do so by selecting the eye icon next to the respective field.
- Add Optional Details:
In the Notes section, you have the flexibility to include additional information like your PIN or billing address, if required. Moreover, you can select “Address” to add an address from the Personal info section of Dashlane.
- Save Your Changes:
After making the necessary edits, simply click on the checkmark icon to securely save the changes to your payment method within Dashlane.
For iOS
To edit a payment method in Dashlane, just follow these easy steps:
- Access Payments:
Navigate to the Payments section and choose the specific card or account you wish to edit.
- Select Edit:
Once you’ve selected the payment method, click on the “Edit” option.
- Make Your Edits:
Modify the necessary details as required. If you need to view or edit hidden information, such as your card or account number, simply click on the eye icon next to the relevant information.
- Save Your Changes:
After making the desired edits, click on “Save” to securely update the payment method in your Dashlane vault.
Auto-Filling Payment Information During Online Checkout
While shopping online, Dashlane offers the convenience of autofilling items you have saved during the checkout process. To enable autofill for payment methods, ensure that you are logged in to your Dashlane account in your computer’s web browser.
During the checkout process, follow these straightforward steps:
- Select The Card Number Field:
When prompted to enter your payment information, click on the Card number field.
- A Pop-Up Appears:
Once you click on the field, a convenient pop-up window will appear.
- Choose Your Desired Payment Method:
From the pop-up, select the card or account you wish to use for payment, and Dashlane will automatically fill in the required form with the relevant details.
- Verify With Your Master Password:
For added security, Dashlane requires you to enter your Master Password to proceed with autofilling payment information. This ensures that only authorized users can access sensitive payment details.
- Select “Unlock”:
After entering your Master Password, click on “Unlock” to verify your identity. Once unlocked, Dashlane will not ask for your Master Password again for auto filling payment methods for the next five minutes. This feature streamlines your shopping experience while maintaining a balance between convenience and security.
How Do I Use Secure Notes In Dashlane?
Secure Notes in Dashlane allow you to save important information securely, while ensuring easy access. Store software keys, WiFi passwords, and other sensitive data privately and share them securely with trusted individuals.
Steps To Create New Secure Notes:
Easily add Secure Notes with a maximum of 10,000 characters. Check the app you’re using for instructions on how to add them.
For Web App:
To create a new Secure Note, head to the Secure Notes section, click on “Add New,” and enter your note in the editor. Save your note to secure it.
For Android App:
To add a new Secure Note, go to Home, then Secure Notes, and click on “+ Add new.” Enter your note in the editor and save by selecting the back arrow icon.
For iOS App:
To create a Secure Note, click on the plus (+) icon on the Home screen. Choose “Add Secure Note” from the menu to open the editor. Enter your note, click on “Done,” and then “Close” to save it securely.
Steps To Attach Files To A Secure Note
Securely store sensitive documents (e.g., passports, birth certificates) by attaching them to Secure Notes. Each file can be up to 15 MB, and you can store up to 1 GB of files in your account. Secure Notes cannot have files attached, and attached files are not included in DASH exports.
For Web App:
In the web app, you can store files by creating or opening a Secure Note, then selecting the “Attached files” tab. To upload a file, choose “Attach file” and select the desired file. Once saved, a paperclip icon appears next to the note in your list of Secure Notes.
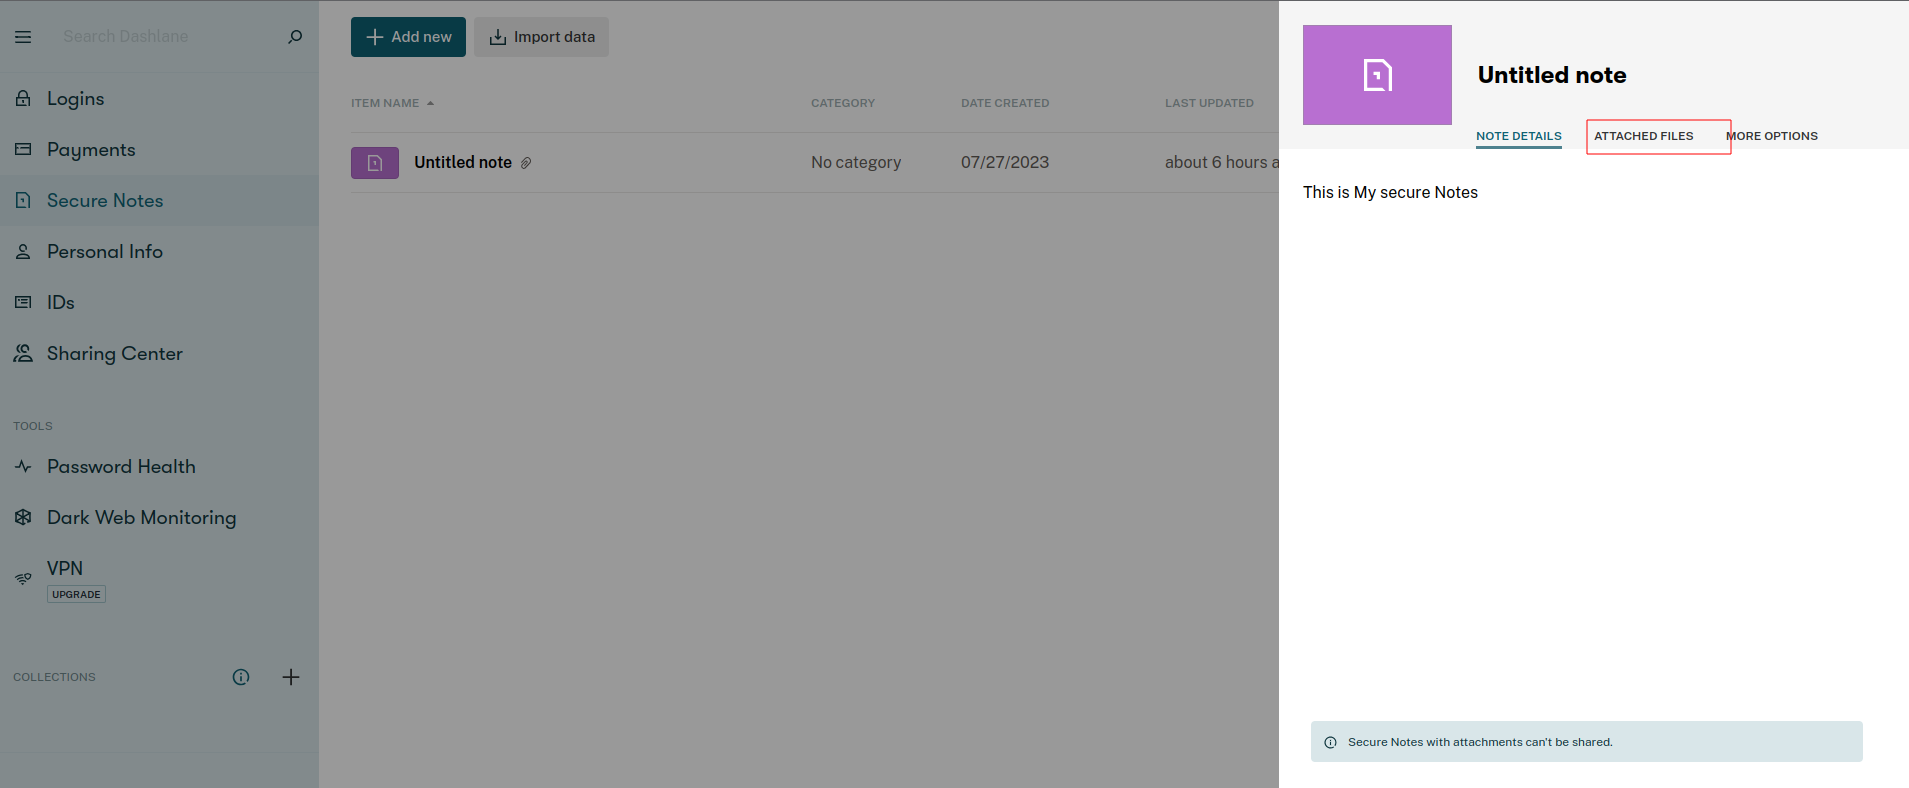
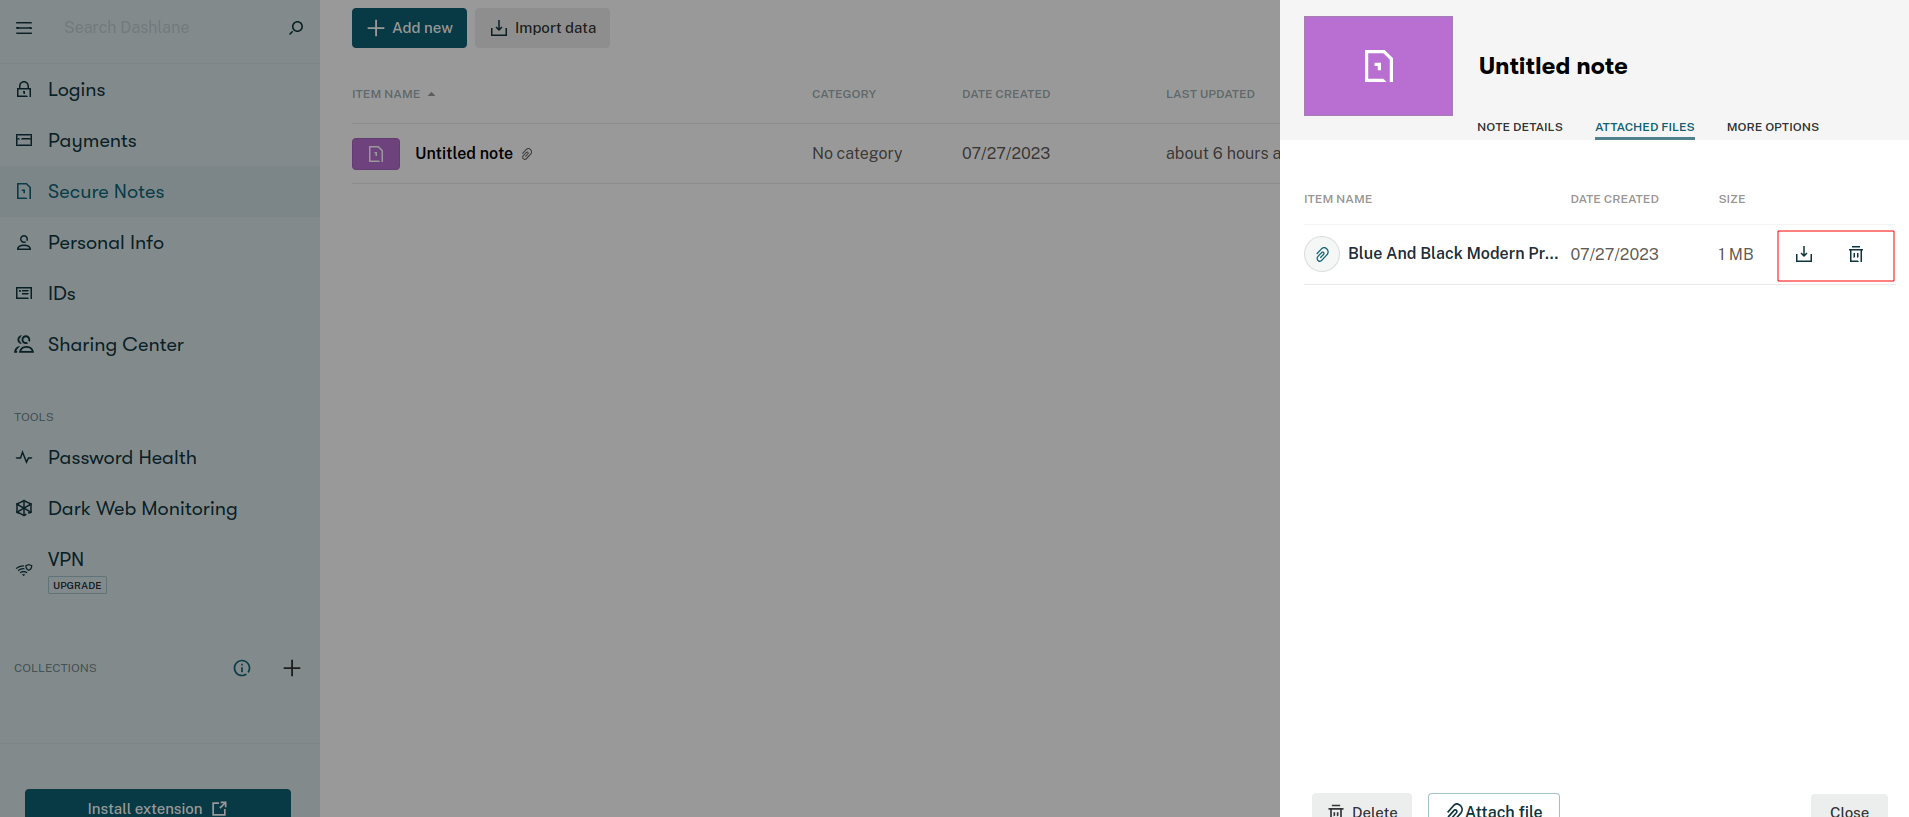
To download or delete a file, open the note and click on “Attached files.” Choose “Download attachment” (down arrow and inbox icon) to download or “Delete attachment” (trashcan icon) to remove the file, confirming your action.
For Android App:
In the Android app, store files by creating or opening a Secure Note. Click the paperclip icon in the menu bar, then the plus (+) icon to upload the desired file. After saving, a paperclip icon appears next to the note in your Secure Notes list.
To manage files, open the note and click the paperclip icon. Select the file and choose from options like “View,” “Save a copy to Download folder,” or “Delete.”
For iOS App:
In the iOS app, store files by creating or opening a Secure Note, then click the paperclip icon in the menu bar. Select the plus (+) icon, and choose how you want to add the file: Take a photo, Scan documents, Choose a photo, or Choose a file. You can rename the file after selecting it. Use “Back” to return to the Secure Note and again to go back to your list of Secure Notes.
To manage files, open the note and click the paperclip icon. Then select the 3-dot menu, where you can choose to Open, Rename, or Delete the file.
Steps To Organize Secure Notes
Organize your Secure Notes by selecting from existing categories and assigning colors for easy identification. Dashlane Starter, Team, or Business plan members can choose to store Secure Notes in either Personal Space or Business Space.
For Web App:
To categorize and add colors to Secure Notes, create or open a note, then click on the More options tab. Select the menu for Category or Color, and choose the desired category or color.
Dashlane Starter, Team, and Business plan members can also select the menu for Space to store the note in Personal or Business Space. Finally, click on Close to complete the process.
For Android App:
To categorize and add colors to Secure Notes, create or open a note, then click on the 3-dot menu. Choose Category or Color from the options and select from the list of categories or colors. Finally, click on the back arrow to close the note.
For iOS App:
To add or change the color of a Secure Note, create or open a note, then click on the wrench icon in the menu. Choose “Color” from the menu options and select your desired color. Click on “Back” to return to your list of Secure Notes.
How To Add And Manage Personal Information To Dashboard?
Dashlane allows you to securely save personal information, like your name, address, and phone number, just like your login details. You can easily autofill this data for deliveries, job applications, and other online forms, ensuring quick and accurate form completion.
For Web Application
Adding Personal Info:
- Go to the Personal Info section.
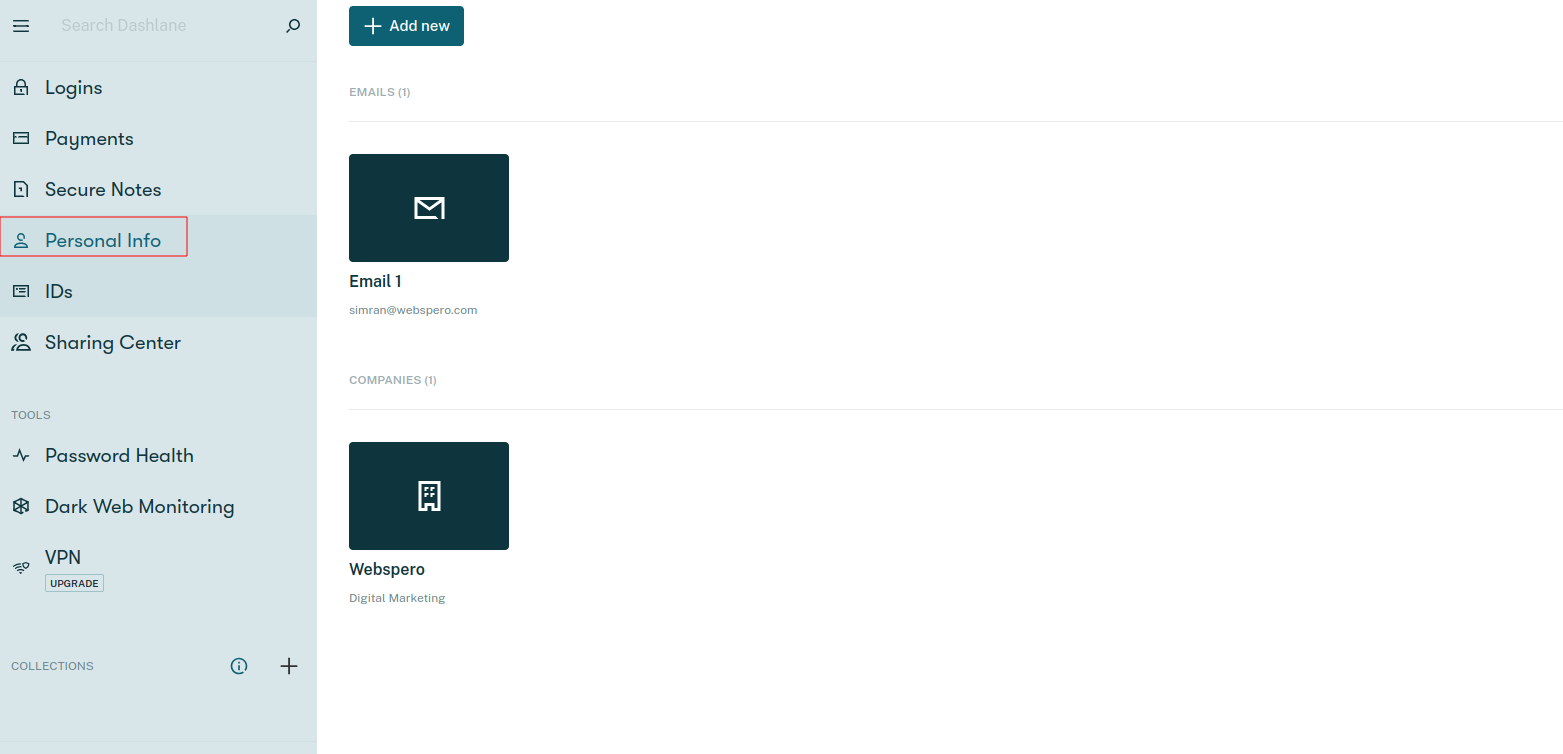
- Click on + Add new.
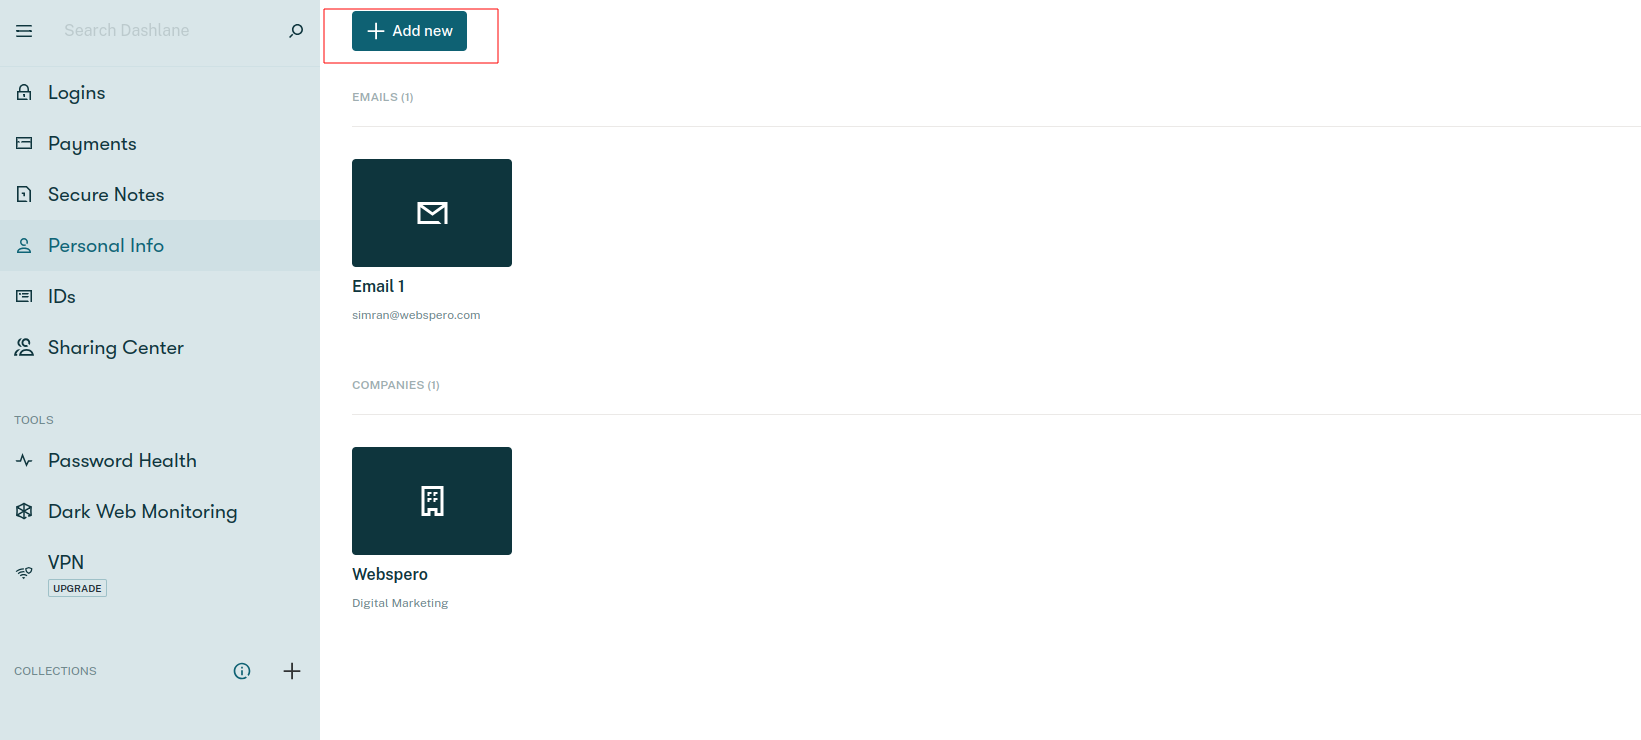
- Choose the data type you want to add (names, emails, phone numbers, addresses, companies, or websites).
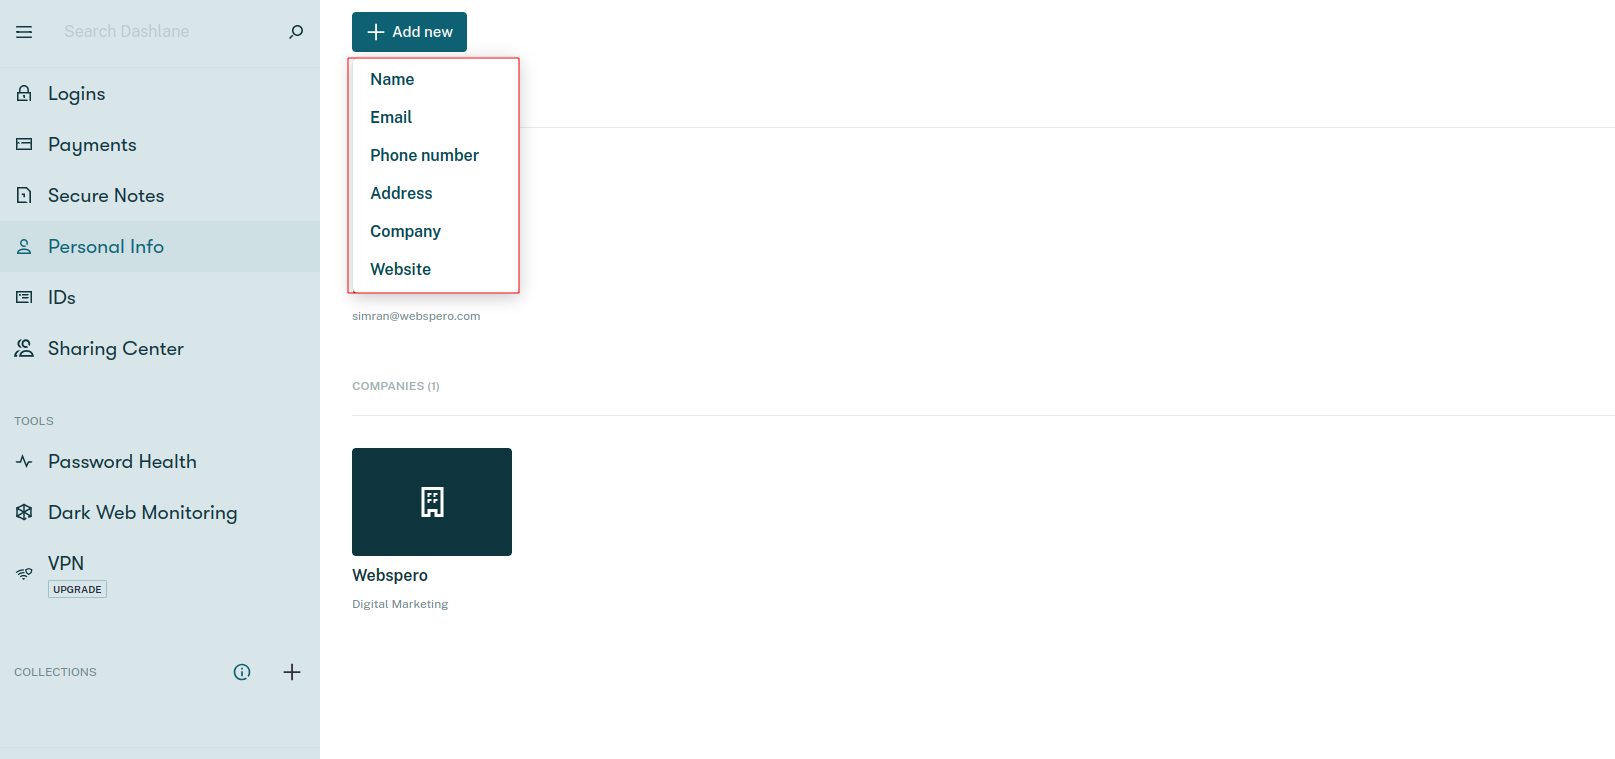
- Enter the information and select Save.
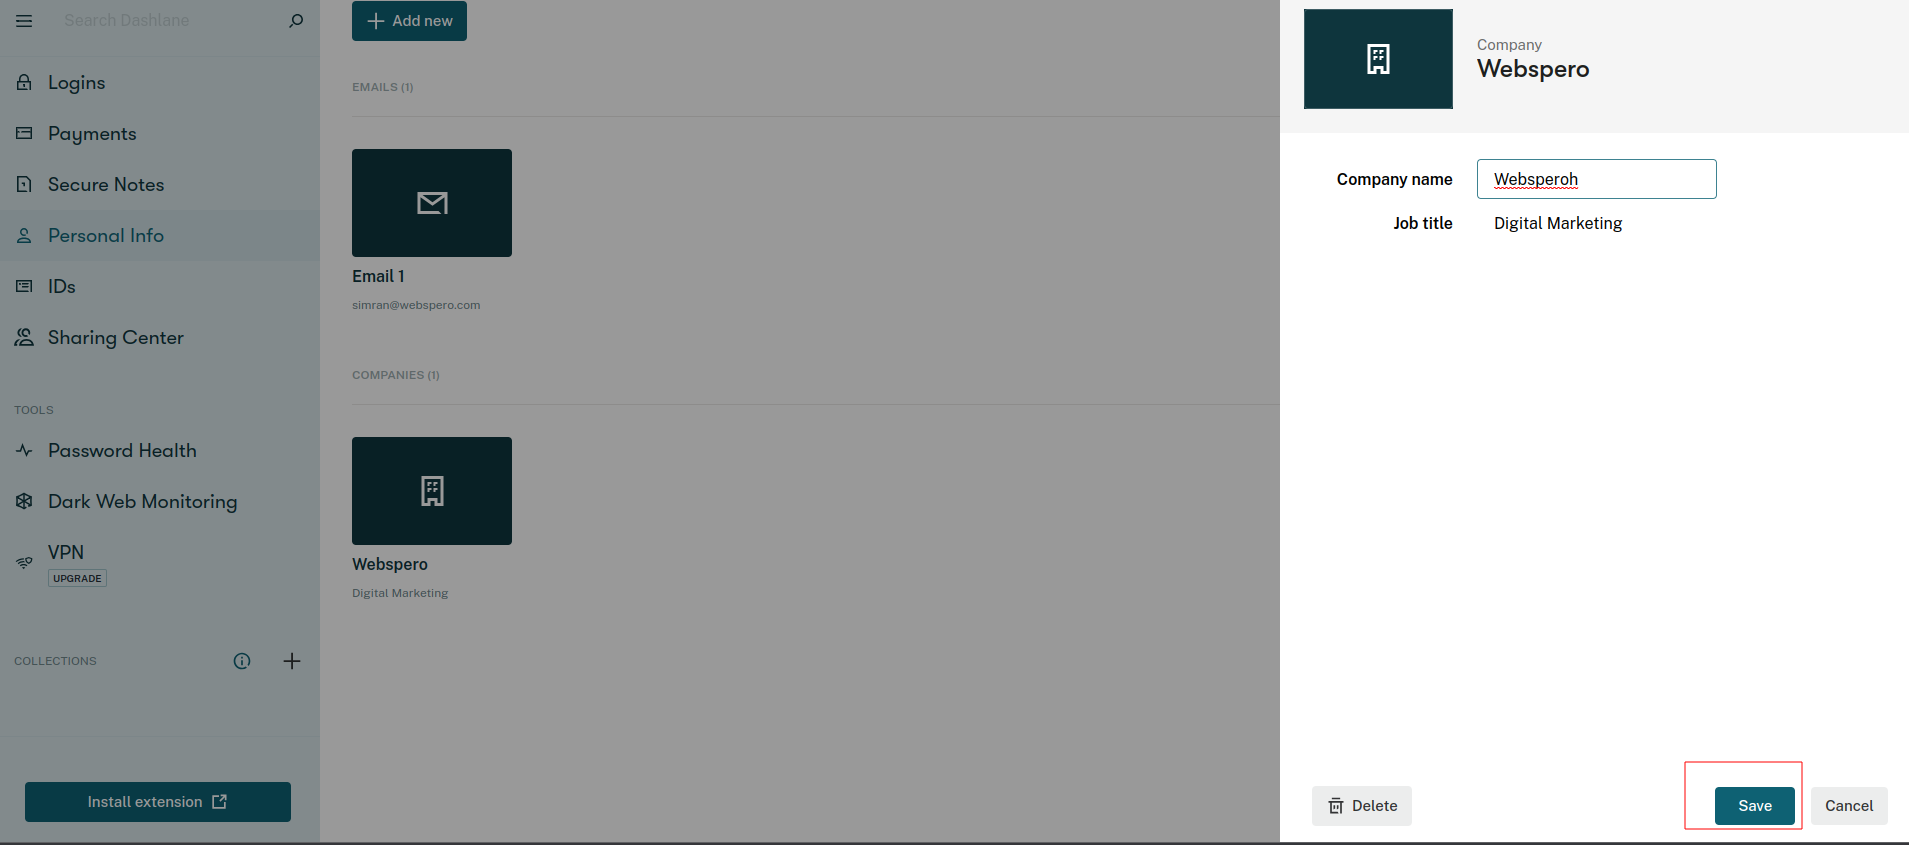
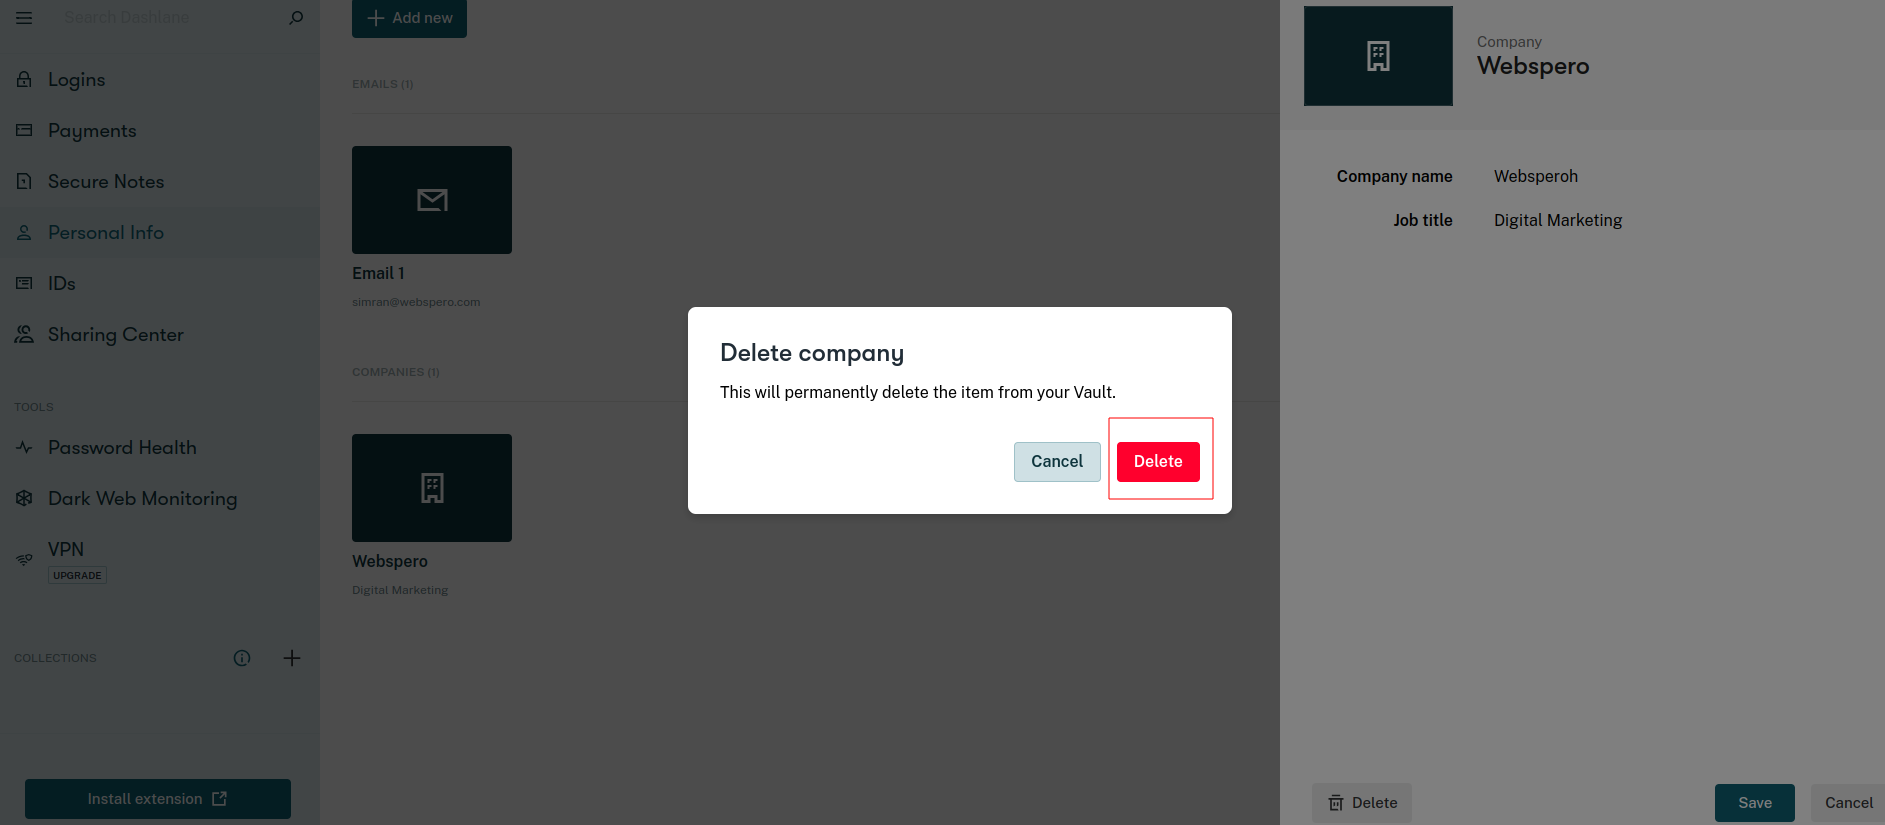
Editing or Deleting Personal Info:
- In any app, access the Personal Info section.

- Select the item you want to edit or delete.
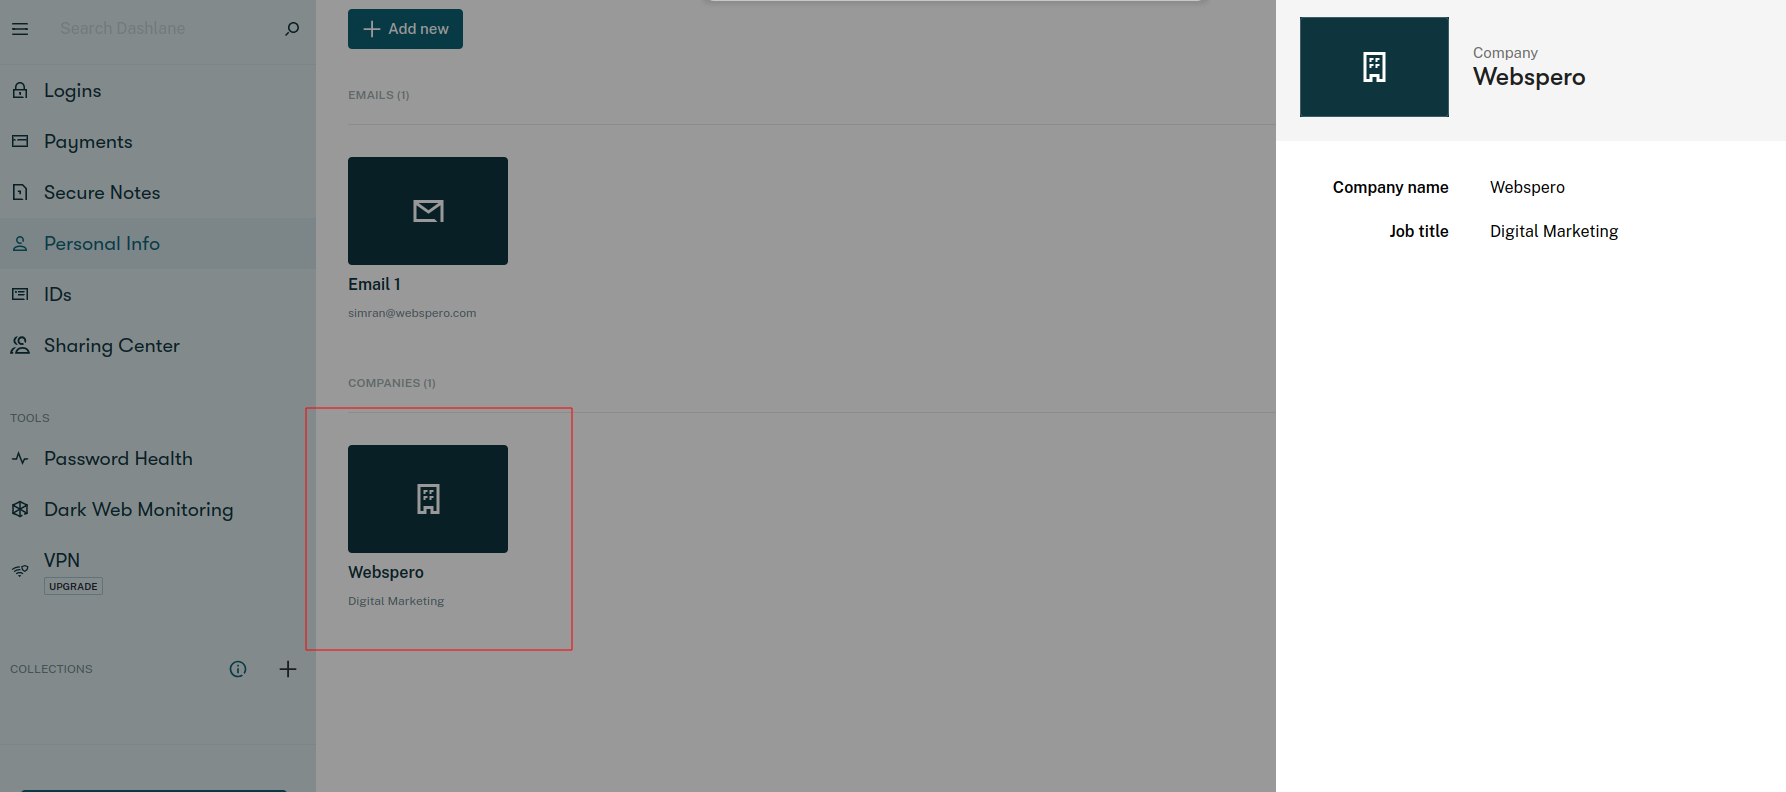
- Make changes directly and click Save to update.

- To remove the item, select Delete and confirm in the pop-up.
For Android Application
Adding Personal Info:
- Go to the Personal Info section.
- Click on + Add new.
- Choose the data type you want to add (names, emails, phone numbers, addresses, companies, or websites).
- Enter the information and select the checkmark to save.
Editing or Deleting Personal Info:
- In the Android app, access the Personal Info section.
- Select the item you want to edit or delete.
- Click on the pencil icon to make changes.
- Select the checkmark to save the updated info.
- To remove the item, select Delete and confirm in the pop-up.
For iOS Application
Adding Personal Info:
- Go to the Home section.
- Click on the plus (+) icon.
- Select Add personal info.
- Choose the data type you want to add (names, emails, phone numbers, addresses, companies, or websites).
- Enter the information and select Save.
Editing or Deleting Personal Info:
- In the iOS (Apple) app, access the Personal Info section.
- Select the item you want to edit or delete.
- Click on Edit to make changes.
- Select Save to save the updated info.
- To remove the item, select Delete and confirm in the pop-up.
How To Add And Manage IDs In Dashlane Software?
Dashlane allows you to securely save identification documents like passports and social security cards. This data is as secure as your login information and can be autofilled accurately whenever needed. You can add general ID cards, passports, driver’s licenses, social security cards, and tax numbers. For other kinds of IDs, use a Secure Note to save the information and attach a scan of the ID for safekeeping.
Adding An ID:
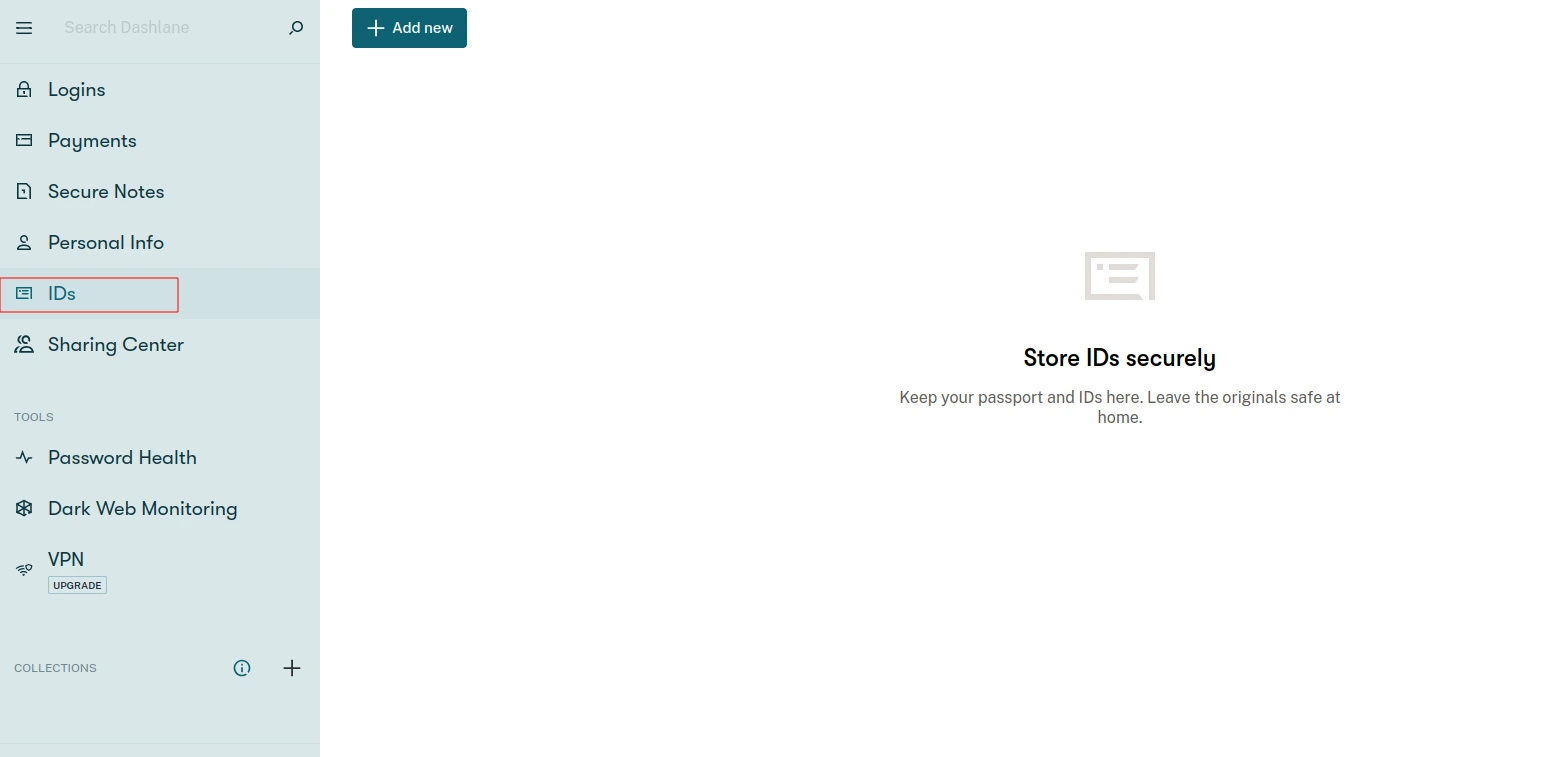
For Web Apps:
- Go to the IDs section.
- Click on + Add new.
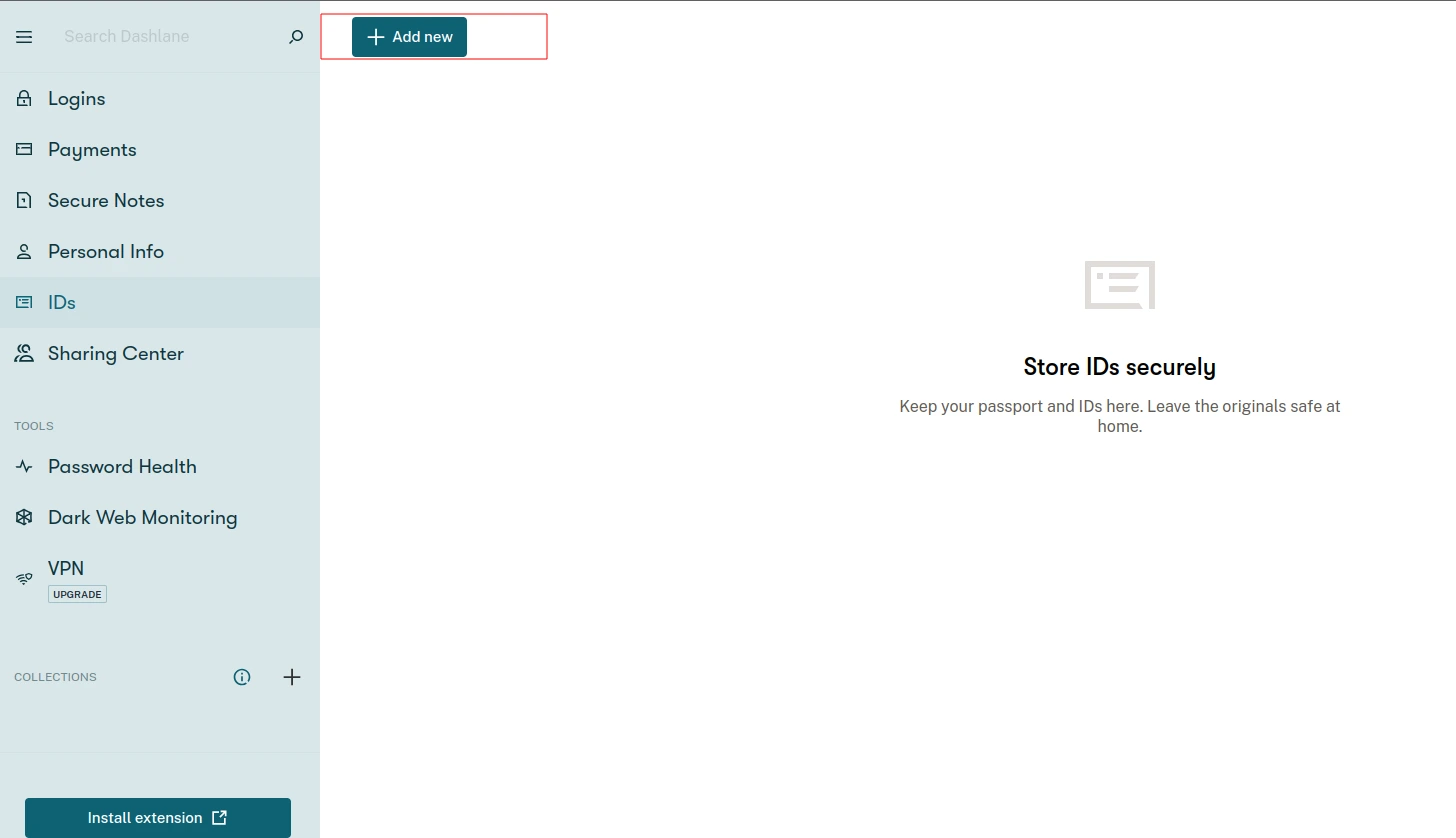
- Choose the type of ID you want to add.
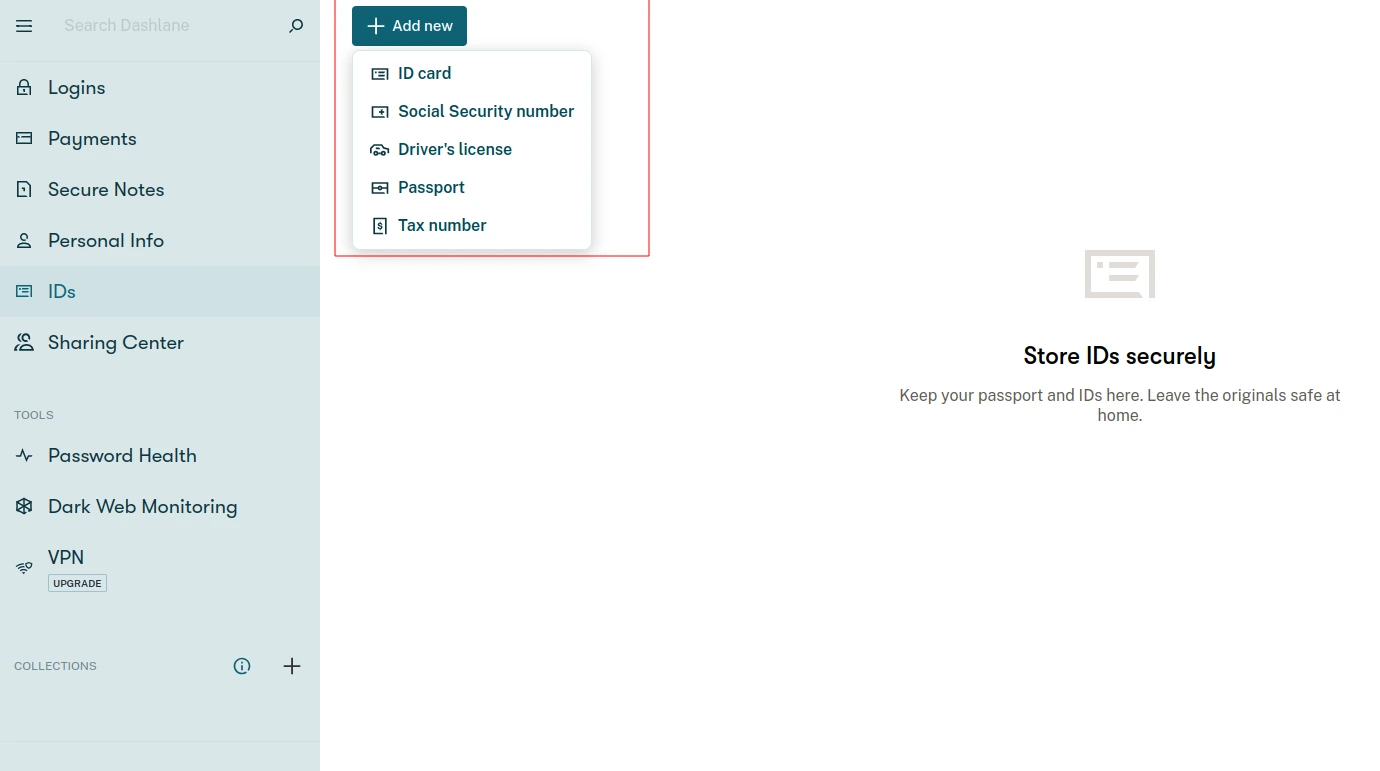
- Enter your information and select Save.
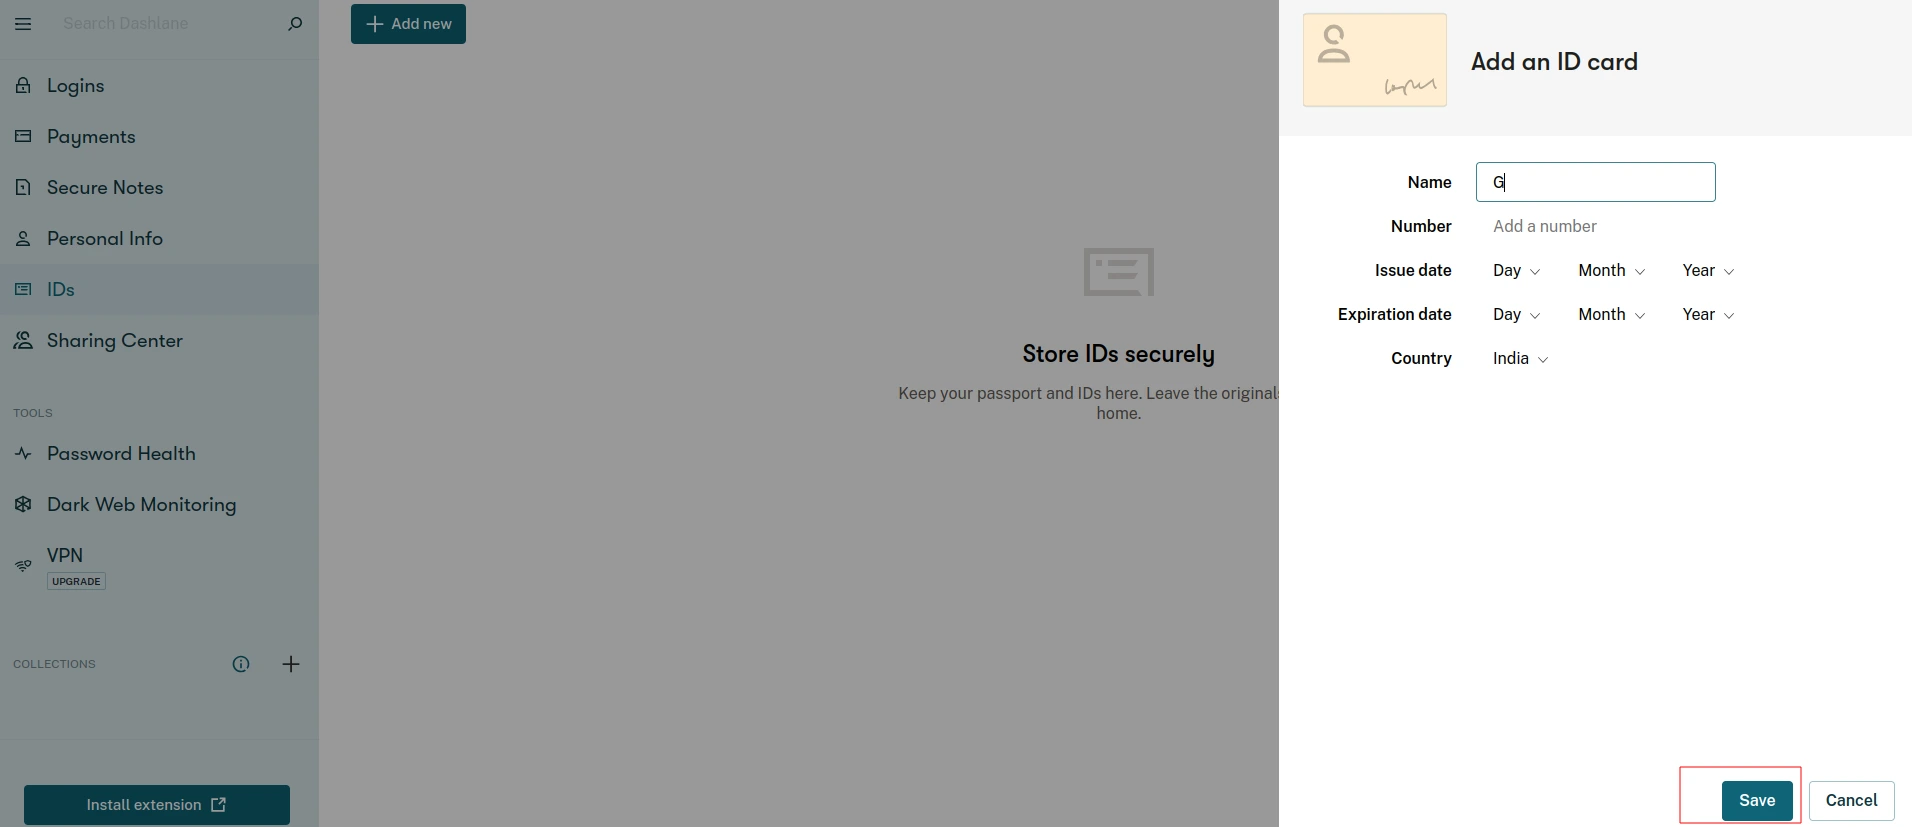
For Android App:
- Go to the IDs section.
- Click on + Add new.
- Choose the type of ID you want to add.
- Enter your information and select the checkmark to save.
For iOS App:
- Go to the Home section.
- Click on the plus (+) icon.
- Select Add ID.
- Choose the type of ID you want to add.
- Enter your information and select Save.
Editing Or Deleting An ID :
For Web Apps:
- In the web app, access the IDs section.
- Select the ID you want to edit or delete.
- Make changes directly and click Save to update.
- To remove the item, select Delete and confirm in the pop-up.
For Android Apps:
- In the Android app, access the IDs section.
- Select the ID you want to edit or delete.
- Click on the pencil icon to make changes.
- Select the checkmark to save the updated info.
- To remove the item, select Delete and confirm in the pop-up.
For iOS Apps:
- In the iOS (Apple) app, access the IDs section.
- Select the ID you want to edit or delete.
- Click on Edit to make changes.
- Select Save to save the updated info.
- To remove the item, select Delete and confirm in the pop-up.
How To Secure Password Sharing Into Saved Items In Dashlane?
Dashlane allows you to securely share one or more logins and Secure Notes with other Dashlane users. You can share with individuals, multiple people, or groups seamlessly through the web or mobile app.
Sharing your data with other Dashlane users is a simple process that can be done through the web app, Android app, or iOS (Apple) app. When you share with someone, they will receive an email invitation and a notification in their Dashlane app’s Notification Center. To access the shared item, they can click on the bell icon in any app.
Let’s learn how to share data in Dashlane:
Sharing A Single Login Or Secure Notes
For Web:
- Select the desired login or Secure Note.
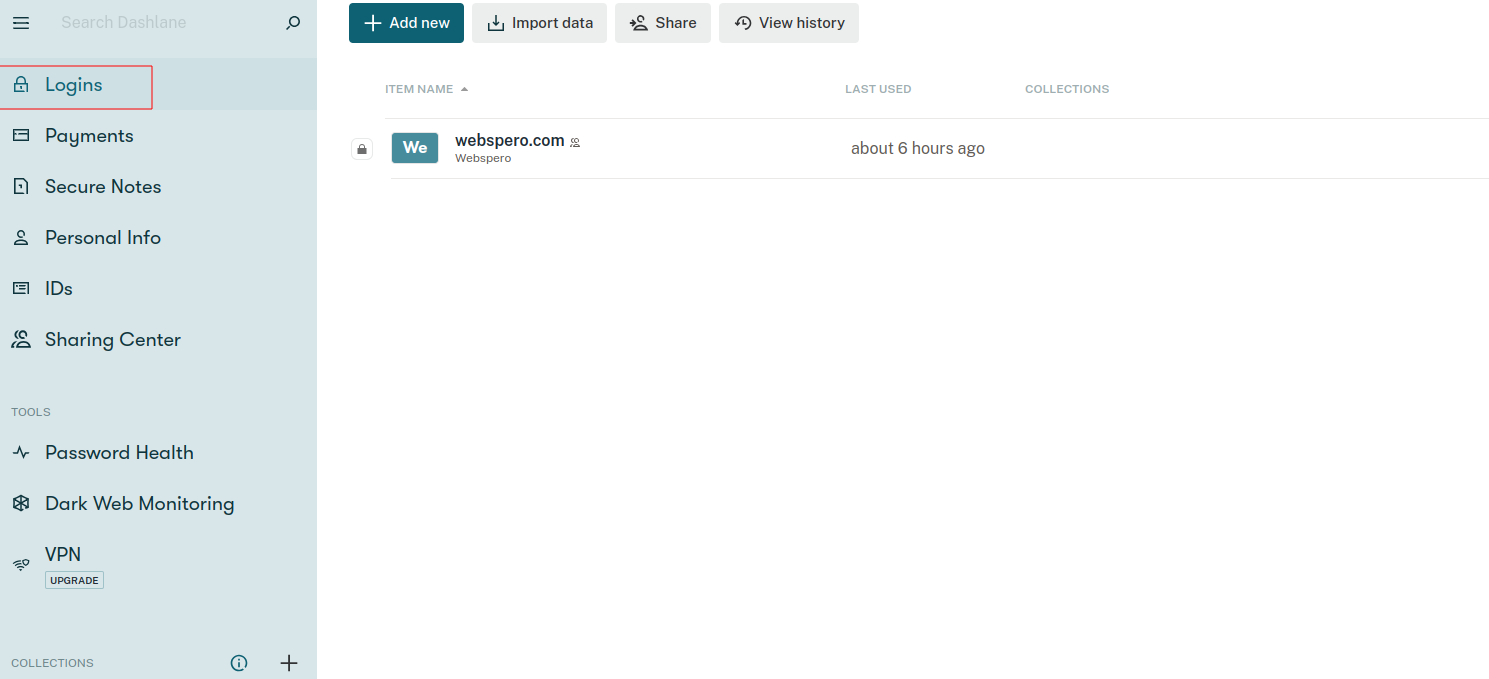
- Click on the Share button.
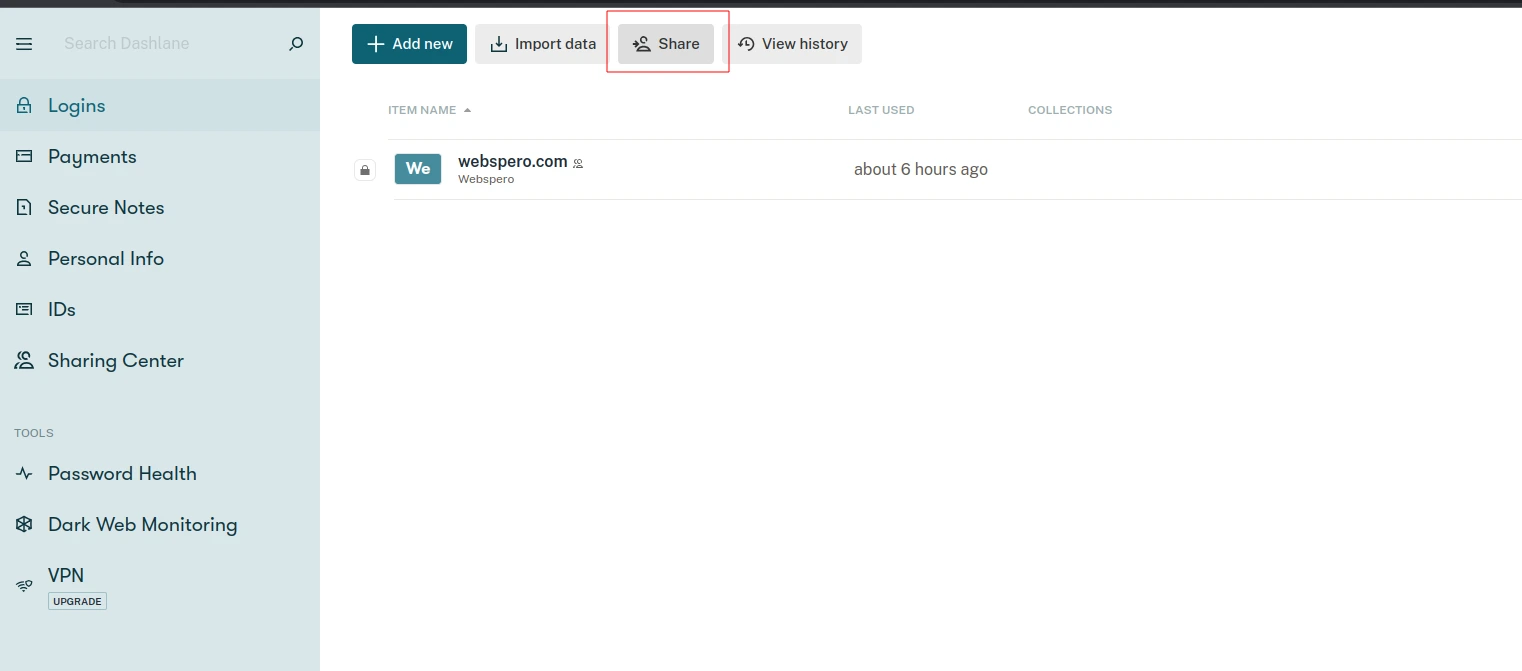
- Enter/select the recipient’s email address.
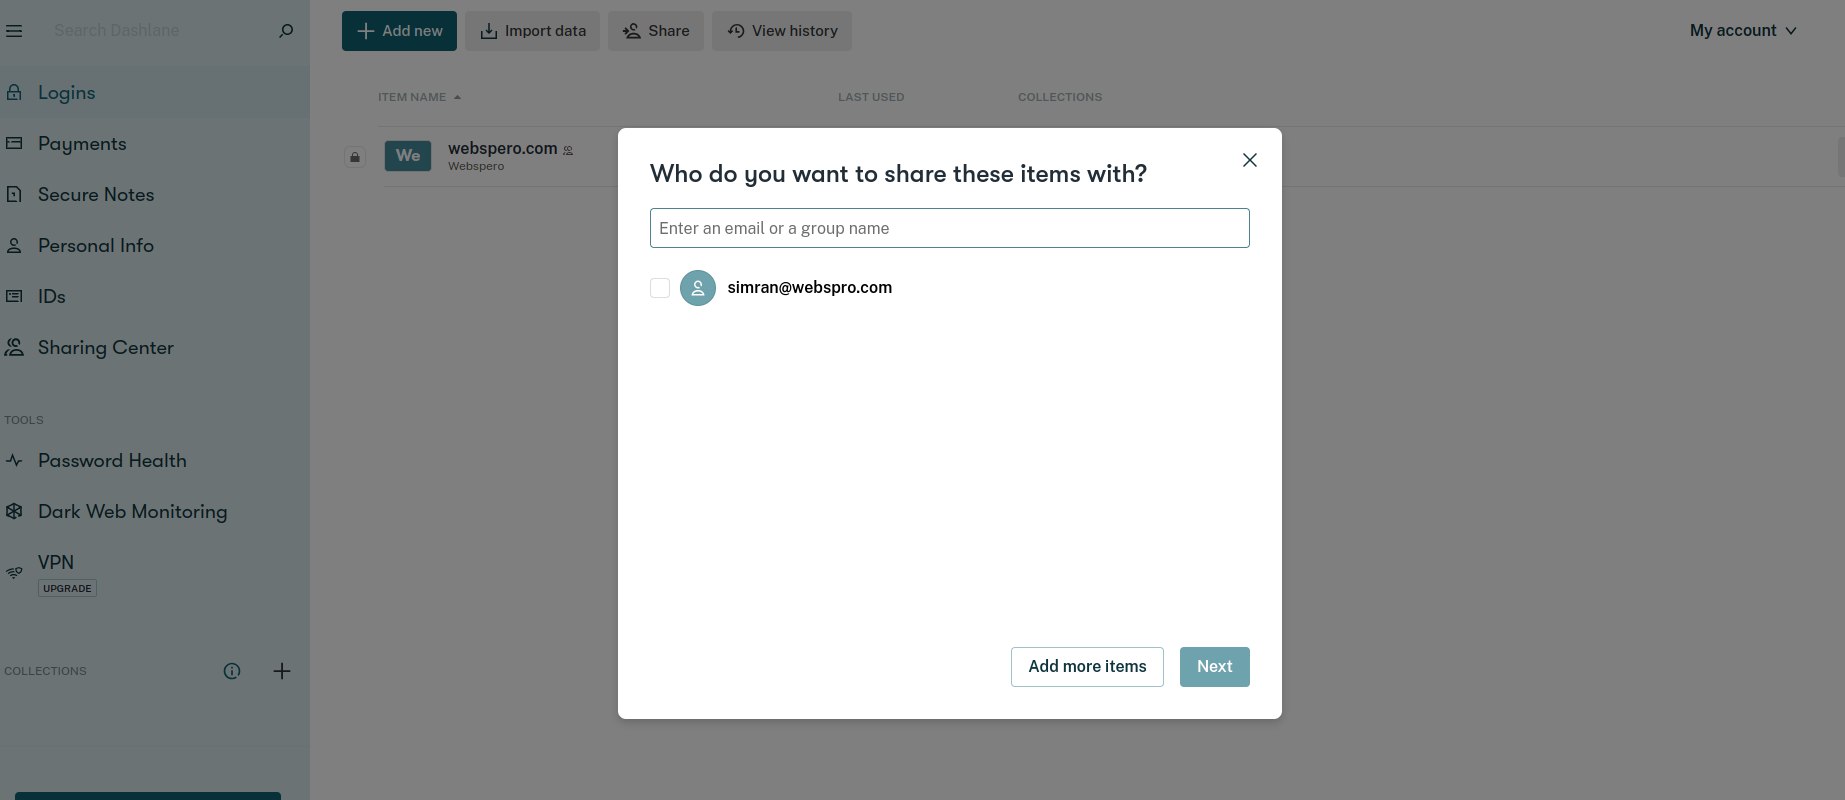
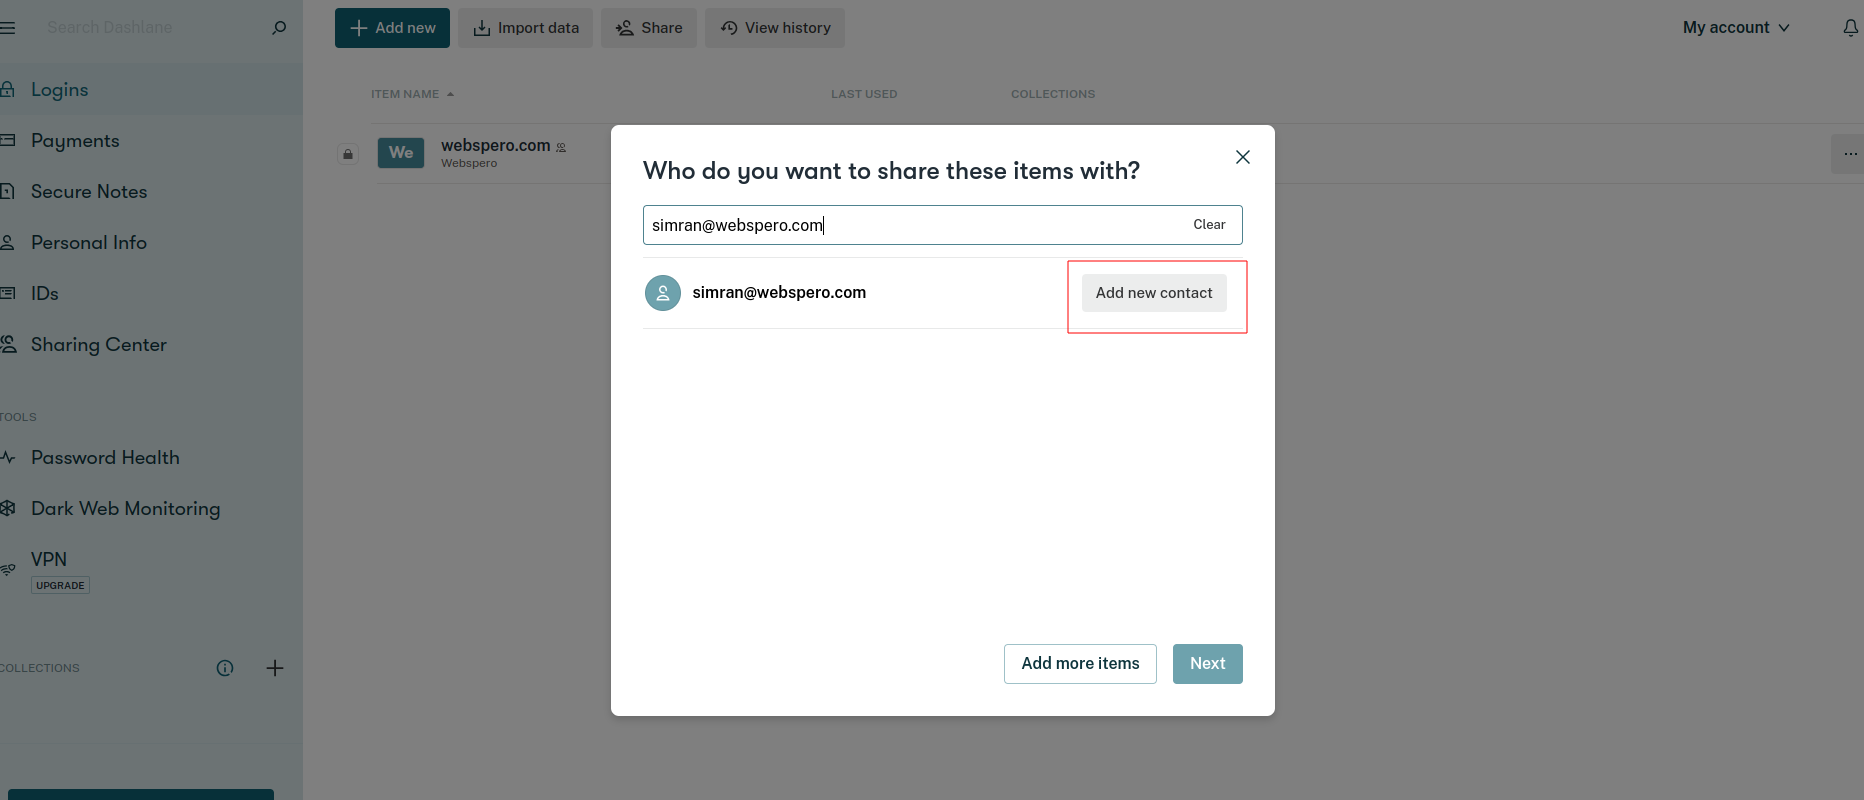
- For new contacts, enter the full email address and choose Add new contact.
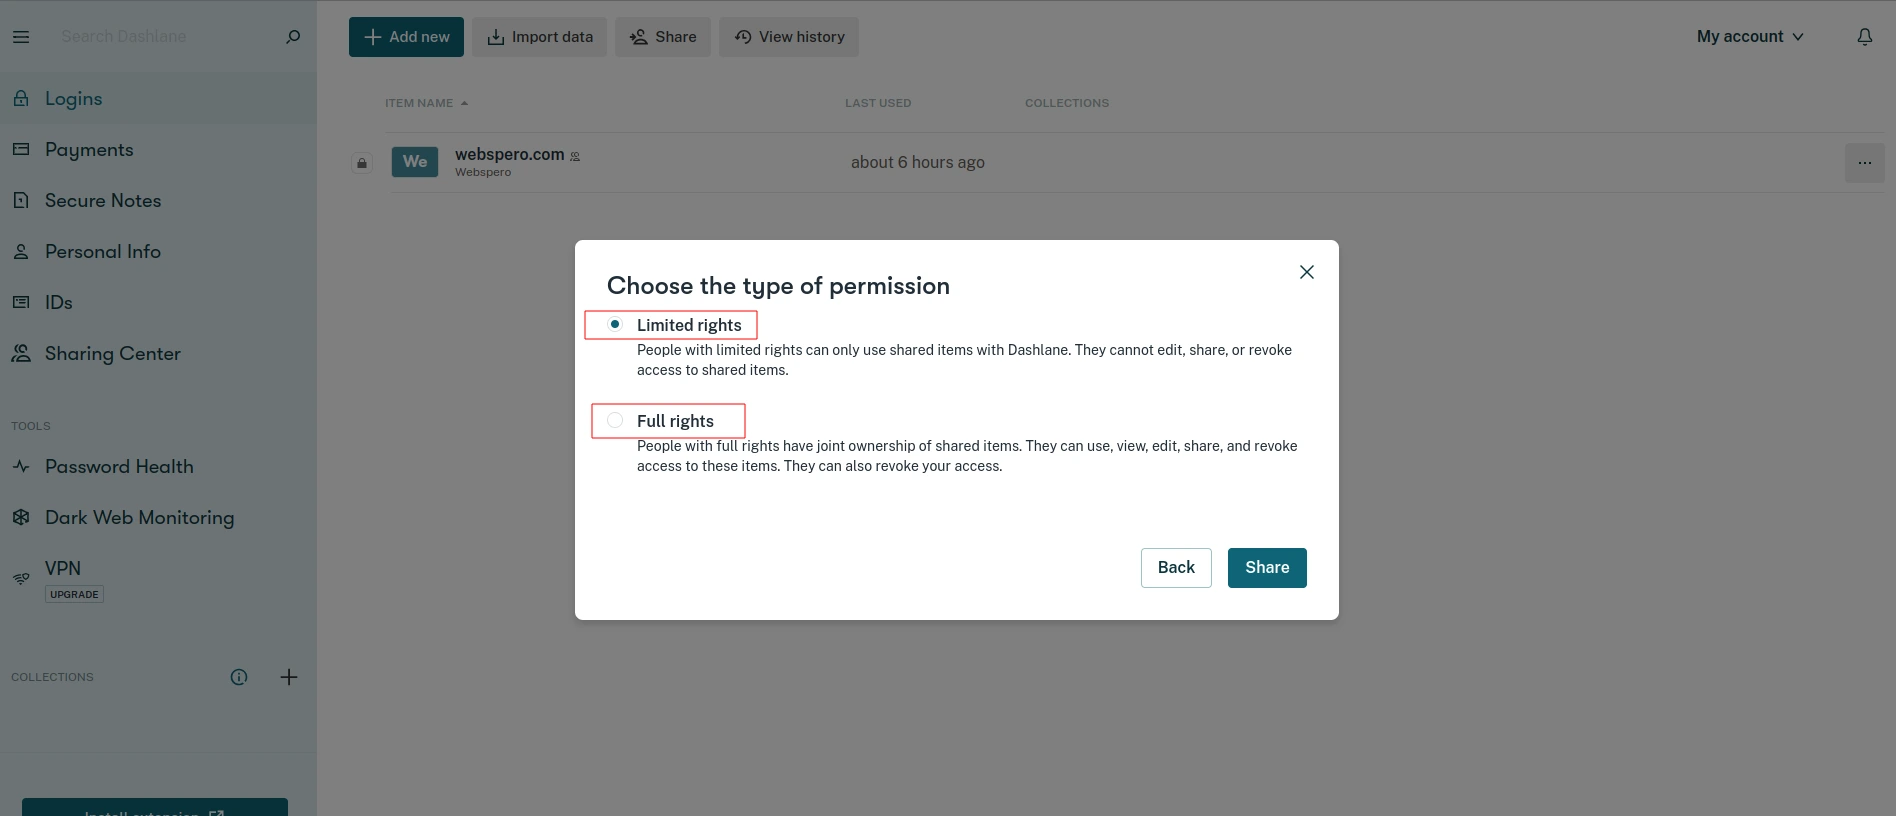
- Choose permission level: Full rights or Limited rights.
- Click Share.
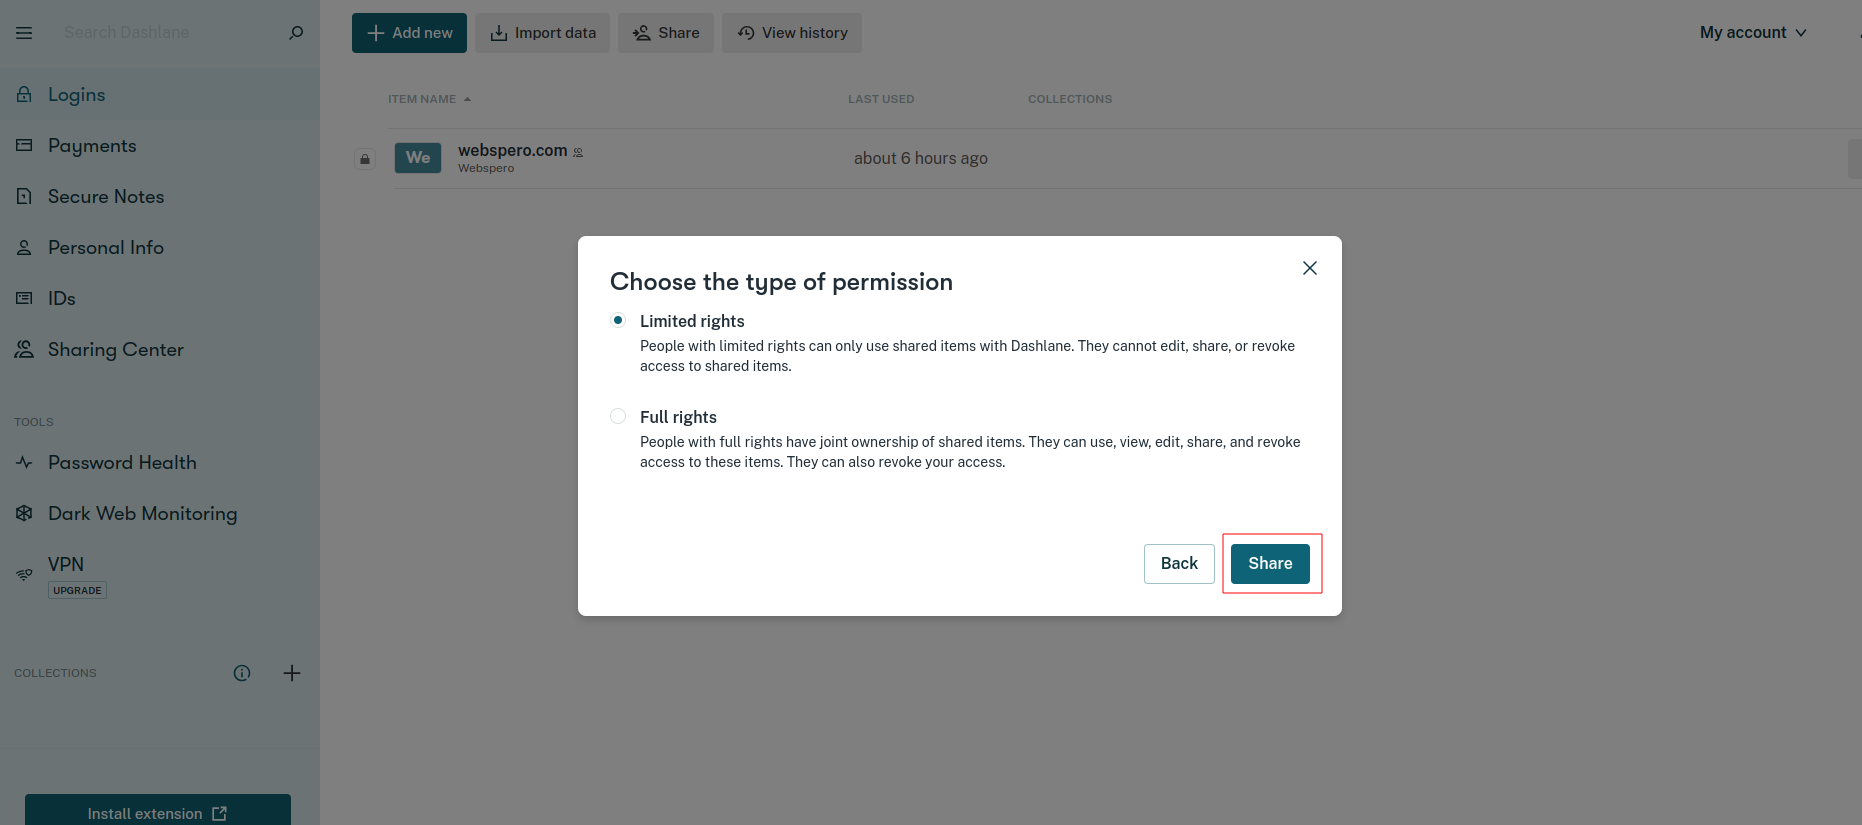
Shared items have a special icon next to their names. To view shared access, select the item in the web app, then go to the Shared access tab.
For Android:
- Go to Logins or Secure Notes and select the 3-dot menu for the item.
- Choose Share from the menu.
- Enter/select the recipient’s email address.
- For new contacts, enter the full email address to add them to the contact list.
- Select Change to pick the permission type: Full rights or Limited rights.
- Click the send arrow to share.
Shared items are marked with a special icon next to their names. To view shared access, select the item in the Android app, then click the information icon (i) in the Sharing section.
For iOS:
- Go to Logins or Secure Notes and select the 3-dot menu for the item.
- Click on Share.
- Enter/select the recipient’s email address.
- For new contacts, enter the full email address to add them to the contact list.
- Choose Permission: Full rights or Limited rights.
- Select Send.
Shared items are marked with a special icon next to their names. To view shared access, select the item’s 3-dot menu, and then click on Share.
Dashlane Dashboard Tools
Password Health
Password health pertains to the extent of password security for individual users or groups within an organization. Our Password Health Score tool employs a distinctive set of metrics to assess the password health of users who utilize Dashlane to manage their passwords. By utilizing the Password Health tool, you can easily identify passwords that require immediate updating and receive recommendations to promptly enhance your Password Health Score.
What Is Password Health Score?
The Password Health score is determined by evaluating all the passwords stored in Dashlane. To calculate the score, greater emphasis is placed on crucial accounts, such as banking and email. You can conveniently filter the results by selecting each tab or view them all together in one list by choosing the “All” option. It’s important to have a minimum of five logins to generate a Password Health score.
What Measures The Password Health Score?
The Password Health Score algorithm works discreetly in the background, evaluating the strength of your passwords. Gaining insight into how the algorithm assesses your passwords can empower you to enhance your password health and prevent potential security breaches.
- Compromised Passwords:
A compromised password is linked to a service or product that recently experienced a security breach, rendering even strong passwords unsafe. If your password is compromised, regardless of its strength, it should be changed immediately and never used again.
- Reused Passwords:
Using the same or similar password for multiple accounts is a risky practice. If one account gets breached, all accounts with that reused password become vulnerable. To bolster security, always rely on a password generator to create unique and complex passwords for each account.
- Weak Passwords:
Weak passwords are easily guessable, often based on personal information like names, addresses, dates of birth, sports teams, or pet names. Additionally, simple passwords such as “12345” or “password” can be easily cracked with software, making them common targets for hackers.
- Excluded Passwords:
Passwords can be excluded from the algorithm’s evaluation. This includes passwords shared with you (that you don’t control) or those related to physical items like your phone or WiFi passcode, which you choose to store in your vault. Once excluded, these passwords won’t impact your Password Health Score and will be kept under the Excluded tab unless otherwise specified.
How To Improve Password Health Score With Dashlane?
Enhancing your digital security involves not only creating strong, unique passwords and securely storing them but also taking measures to thwart cybercriminals effectively. Implement the following measures to improve password health:
- Utilize a VPN for WiFi Protection
Creating strong, unique passwords and securely storing them is crucial for safeguarding your logins against cybercriminals. However, taking additional measures can further elevate your digital security, and Dashlane offers a convenient solution.
- Turn on 2-Factor Authentication (2FA)
Enhance the security of your online accounts by implementing 2-factor authentication (2FA). Dashlane provides an easy-to-use Authenticator tool and standalone app to add an extra layer of identity verification during logins.
- Mitigate Risk with Dark Web Monitoring
Stay one step ahead of potential hacks by utilizing Dark Web Monitoring. Dashlane’s real-time monitoring detects leaked logins, allowing you to change compromised passwords before they can be exploited. This feature is available on all paid Dashlane plans.
How To Generate Strong Passwords?
By default, Dashlane’s password generator generates credentials with only 16 characters. However, it is advisable to create passwords with at least 20 characters, incorporating a mix of digits, letters, and symbols.
One notable feature we appreciate in Dashlane is its password history. This functionality enables you to access previous versions of your credentials, including passwords generated by Dashlane but not utilized. This comes in handy, especially in situations where you inadvertently close the app without saving your new password on a website.
Dark Web Monitoring
Dark web monitoring involves actively searching for and monitoring information that exists within the dark web. Specifically, it focuses on identifying any instances of your personally identifiable information (PII) on websites commonly frequented by cybercriminals.
How To Protect Data From Dark Web?
The dark web can be a treacherous place, so it’s crucial to safeguard your information and be proactive against data breaches. Thankfully, there are several advanced cybersecurity tools available to protect your data from a safe distance.
- Run a Dark Web Scan:
Despite strong password policies and anti-malware software, no cybersecurity tools are entirely foolproof. Running a dark web scan allows you to determine if your passwords, email addresses, or other private information have been compromised and need immediate updating.
- Utilize Dashlane Dark Web Insights:
For businesses, Dashlane offers Dark Web Insights, a built-in tool that continuously scans over 20 billion dark web records. This proactive approach helps protect employees from security breaches and vulnerabilities. Alerts are sent to both employees and IT admins immediately if any private information is detected. This includes all workers, even those who are not yet using Dashlane, as the scans are based on the company domain.
- Enable 2-Factor Authentication (2FA):
Implementing 2-factor authentication adds an extra layer of security by requiring a second credential, like a code sent through an app or text message, to confirm your identity. This makes it significantly more challenging for intruders to access your accounts without possessing your device. Multi-factor authentication (MFA) with two or more factors, such as biometric identifiers like facial recognition or fingerprints, provides even higher security levels.
- Use VPN on Public WiFi:
Public WiFi networks in places like airports, cafés, and hotels are susceptible to hacking attempts. Using a VPN encrypts all data going in and out of your device, routing it through a secure portal, minimizing the risk of your information being intercepted. Additionally, a VPN masks your IP address, enhancing your online privacy.
- Avoid Reusing Passwords:
Reusing passwords might seem convenient, but it weakens security significantly. If one password gets stolen and sold on the dark web, multiple accounts become vulnerable. Replace reused passwords with strong ones, consisting of at least 12 characters with a random mix of letters, numbers, and special characters, avoiding easily identifiable information like your name or address.
- Share Passwords Securely:
While password sharing is sometimes necessary, it should be done as securely as possible. Shared passwords expose everyone in the group to cybercrime risks. The safest way to share passwords is by using the encrypted sharing portal of a password manager. Dashlane’s password-sharing tool allows you to send Secure Notes or passwords securely to other Dashlane users.
How Dashlane Protects Your Data From Dark Web?
For most of us, the dark web is a place we’d never want to visit. However, Dashlane’s advanced features, such as Dark Web Insights, take the initiative to monitor the dark web on our behalf, ensuring that our private information remains secure and hidden from malicious actors.
Dashlane also offers standard features that add extra layers of protection. The advanced Password Generator creates strong and unique passwords, while AES-256 encryption keeps your data secure. Two-Factor Authentication (2FA) adds an additional level of verification, and the VPN feature enhances your online privacy. Moreover, the Password Health score continually monitors your passwords, helping you identify and address weak, reused, or compromised passwords to further reinforce your information’s safety and keep it away from the dark web.
How To Turn On Dark Web Monitoring?
For Web:
Setting up Dark Web Monitoring in Dashlane:
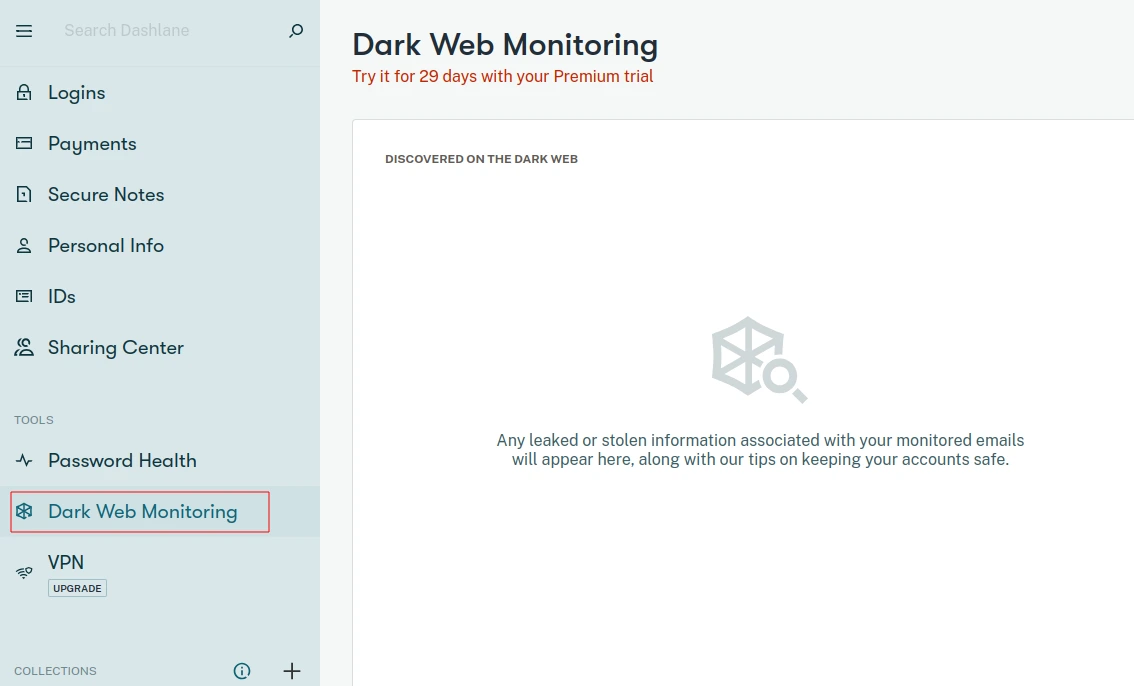
- Access the Dark Web Monitoring section:
Open the web app and navigate to the side menu, where you’ll find the Dark Web Monitoring section.
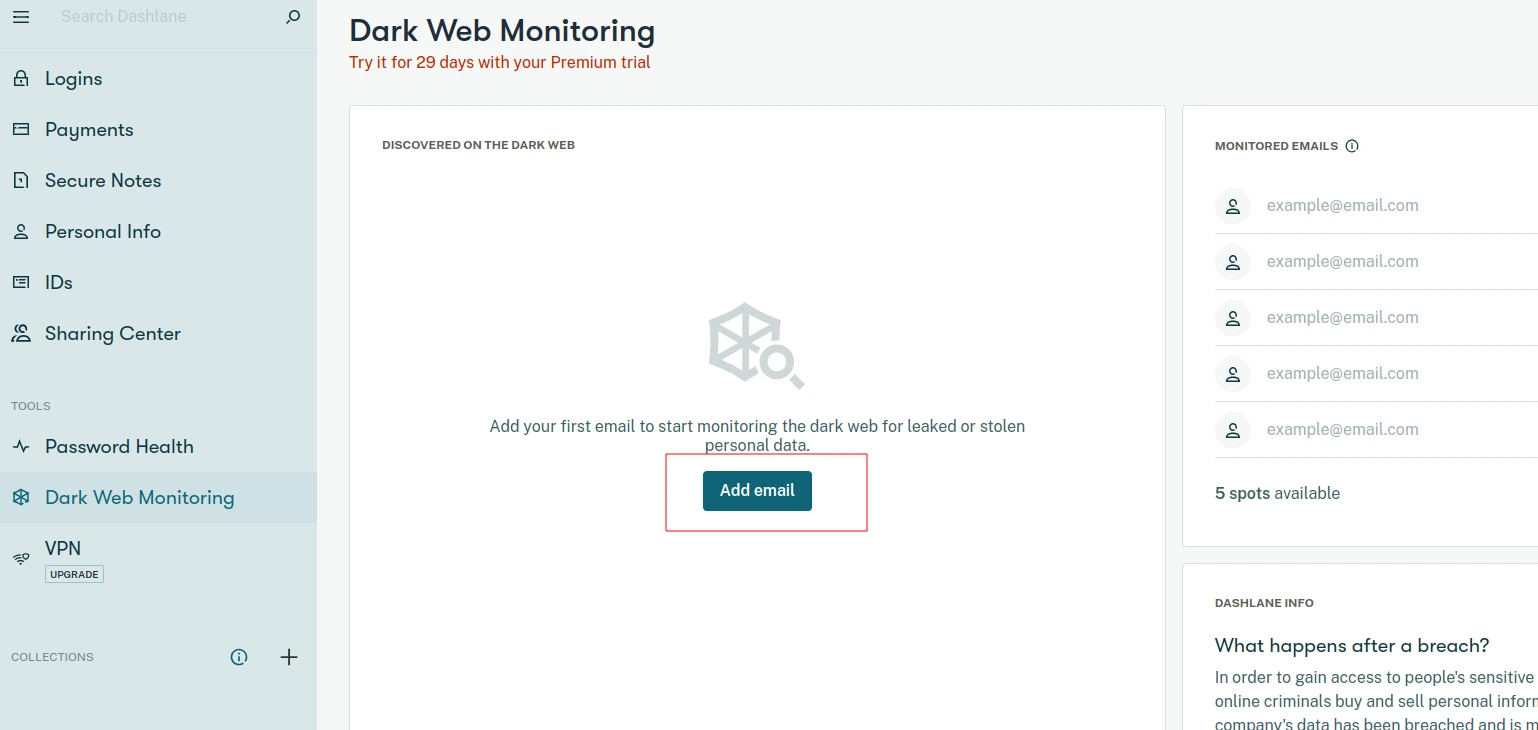
- Initiate Dark Web Monitoring for your email:
If this is your first time using Dark Web Monitoring, click on “Monitor your first email.” However, if you already use Dark Web Monitoring for other email addresses, choose “Add email.”
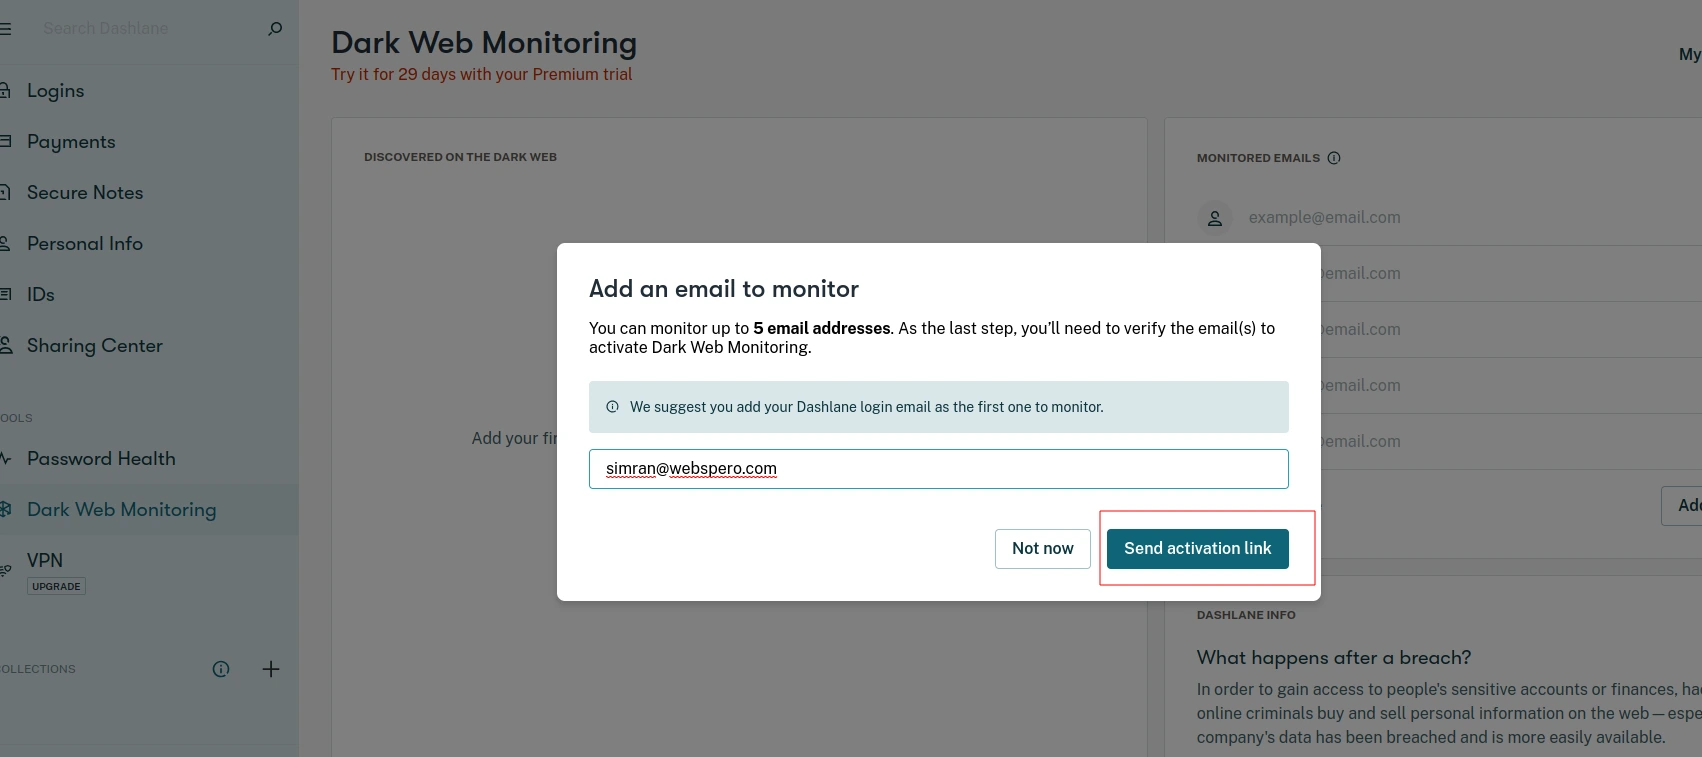
- Enter the email address for monitoring:
Provide the email address that you wish to monitor and click on “Send activation link.”
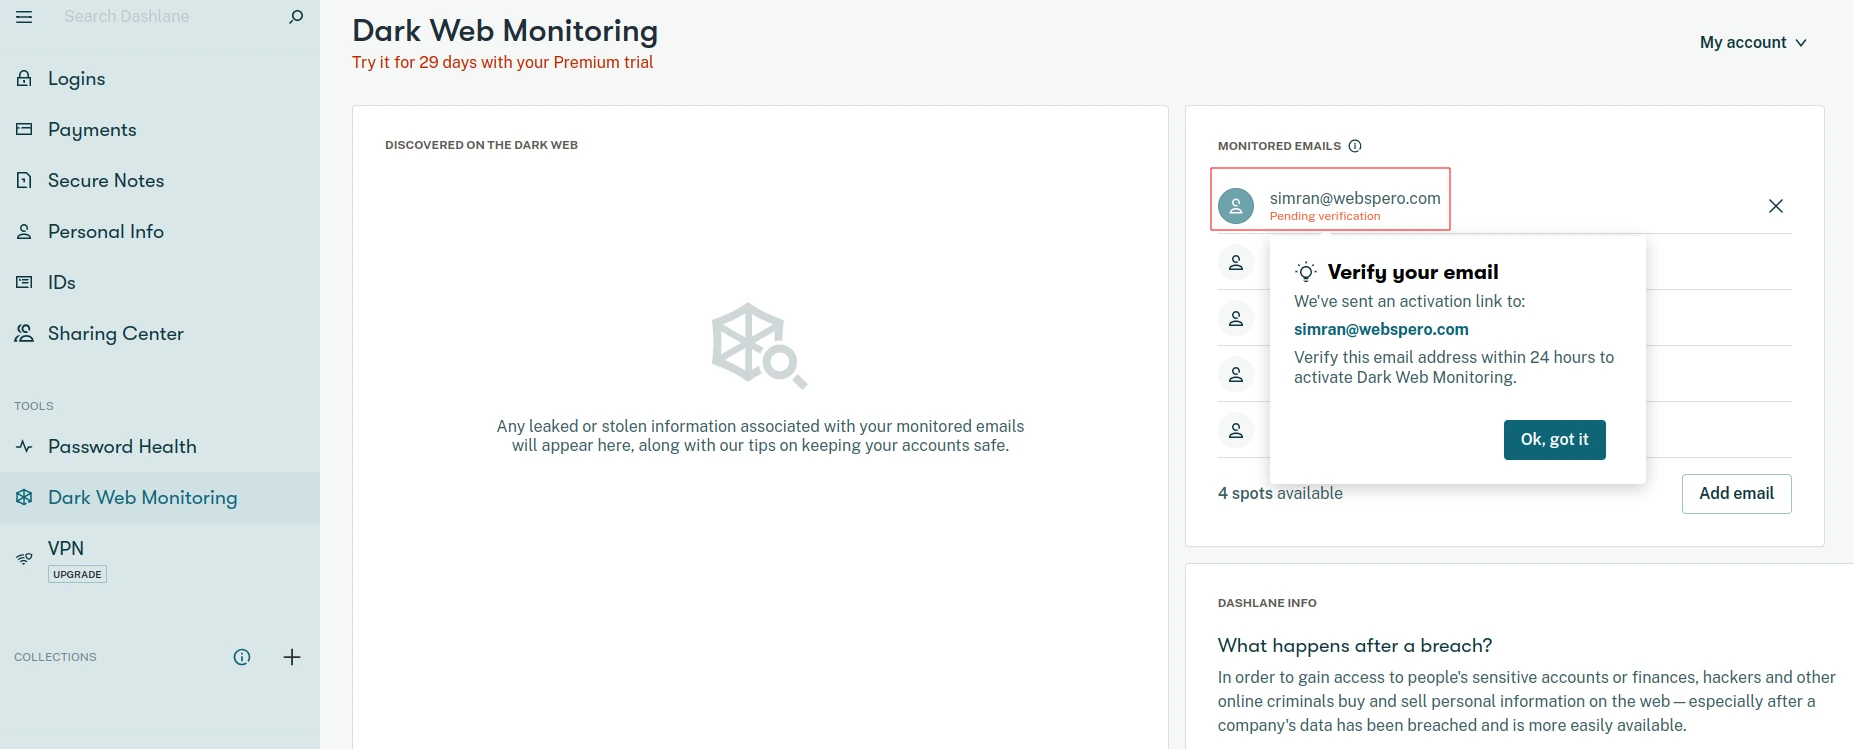
- Confirm the email address:
Check your inbox for an email from Dashlane, which will ask you to confirm the monitoring request. Open the email and select “Yes, I confirm this request.” Your email address will be marked as “Pending” in Dashlane until it is verified. Note that the link sent to your email will remain valid for 24 hours. If you cannot find the email, remember to check your spam folder.
For Android:
Steps to Set Up Dark Web Monitoring in Dashlane:
- Open the Menu:
Click on the three parallel lines to open the menu in Dashlane and navigate to the Dark Web Monitoring section.
- Start Monitoring:
If you are using Dark Web Monitoring for the first time, click on “Start monitoring.” If you already use Dark Web Monitoring for other email addresses, click on the down arrow to access the list of monitored emails and select “Add email.”
- Enter the Email Address:
Input the email address you want to monitor and click on “Confirm.”
- Check Your Confirmation Email:
After submitting the email address, you will receive an email from Dashlane requesting confirmation. Locate this email in your inbox.
- Confirm the Request:
Open the email and click on “Yes, I confirm this request” to verify your email address. Until you complete the verification, the email address will be marked as “Pending your verification” in Dashlane. The confirmation link in the email remains valid for 24 hours.
- Check Spam Folder:
If you do not find the email in your inbox, check your spam folder to ensure you receive the confirmation email.
For iOS:
Steps to Set Up Dark Web Monitoring on the Dashlane iOS App:
- Open the Dashlane iOS (Apple) app and access the Tools section from the bottom menu.
- If you are using Dark Web Monitoring for the first time, select “Dark Web Monitoring” and then click on “Start monitoring.” If you already use Dark Web Monitoring for other email addresses, choose the down arrow to access the list of monitored emails and click on “Add email.”
- Enter the email address you wish to monitor and select “Start monitoring.”
- Check your inbox for an email from Dashlane. Open the email and click on “Yes, I confirm this request” to verify your address. The email address will be marked as “Pending your verification” until you complete this step. Note that the verification link sent to your email remains valid for 24 hours. If you do not find the email in your inbox, be sure to check your spam folder.
Dashlane VPN Protection With HubSpot Shield
A virtual private network (VPN) is a valuable tool that adds an additional layer of protection to your online activities. By using a VPN, you can browse the internet safely, even on unsecured networks, and significantly improve your online privacy.
To offer you the best VPN service, we have partnered with Hotspot Shield. With Hotspot Shield Premium, you gain access to top-notch VPN features and 24/7 Tech Support. Setting up your Hotspot Shield Premium account is a breeze, and you can do it directly from your Dashlane app for a seamless experience.
Steps To Set-Up Hotspot Shield VPN
For Web:
- Access the Dashlane web app and go to the Tools section of the menu.
- Under Tools, select “VPN.”
- Enter the email address you wish to use with Hotspot Shield. Dashlane may autofill your account contact email, but you have the option to choose another email address if needed.
- Take a moment to read and review Hotspot Shield’s Terms of Service and Privacy Policy. Once you have done so, select the “I agree” checkbox, and then click on “Activate account.” Dashlane will automatically generate a secure password for your Hotspot Shield account.
- After activating your account, proceed to download the Hotspot Shield app. Locate the section titled “Access your VPN via the Hotspot Shield app,” and click on “Download it” to get the app.
For Android:
- Open the Dashlane app and access the Tools section from the menu.
- Navigate to the “Virtual private network” screen and select “Activate account.”
- Provide the email address you wish to associate with Hotspot Shield. Dashlane may autofill your account contact email, but you have the option to use a different email address if desired.
- Review Hotspot Shield’s Terms of Service and Privacy Policy. Once you have read them thoroughly, click on the “I agree” checkbox and then select “Confirm.” Dashlane will automatically generate a secure password for your Hotspot Shield account.
- Proceed to download the Hotspot Shield app by clicking “Get the App” on the VPN page within Dashlane. Alternatively, you can search for the Hotspot Shield app directly in your mobile device’s app store.
For iOS:
- Go to the Tools menu in Dashlane and choose “VPN.”
- On the Virtual private network page, click on “Activate account.”
- Enter the email address you wish to associate with Hotspot Shield. Dashlane will auto-fill your account’s contact email, but you can choose to use a different one if you prefer.
- After carefully reviewing Hotspot Shield’s Terms of Service and Privacy Policy, select the “I agree” checkbox and then click on “Confirm.” Dashlane will automatically generate a secure password for the Hotspot Shield account.
- Next, select “Launch Hotspot Shield” on the Virtual private network screen to download the Hotspot Shield app.
- Alternatively, you can search for the Hotspot Shield app in your mobile device’s app store and download it from there.
Browser Extension:
Dashlane offers a browser extension that allows users to easily manage their passwords while browsing the web. The extension automatically saves passwords and other login information, making it easy to log in to websites without having to remember multiple usernames and passwords. Dashlane also offers browser extensions for Google Chrome, Firefox, Safari, and Microsoft Edge.
How To Add A Dashlane Extension To Chrome?
Adding the Dashlane extension to Google Chrome can significantly streamline password management and enhance online security. Here is a step-by-step procedure to seamlessly add Dashlane extension to Chrome:
Install Dashlane Extension:
- Launch Google Chrome on your computer and ensure it is up-to-date.
- Open the Chrome web store and search for “Dashlane” in the search box.
- Locate the officially supported Dashlane browser extension and open its details page.
- Verify that you have selected the correct extension.
- Click the “Add to Chrome” button on the Dashlane extension page.
- Grant permission to install the extension when the pop-up appears.
- Wait for the Dashlane extension to download, install, and appear in the Extensions menu.
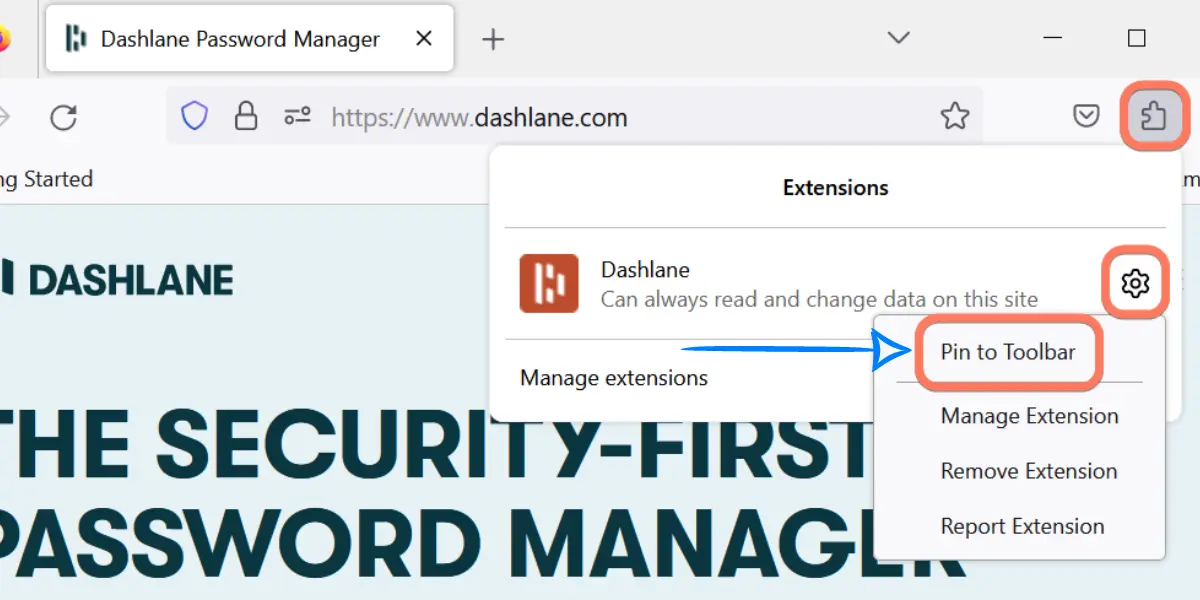
Create a Dashlane Account:
- Click on the Dashlane extension icon in the Chrome toolbar.
- If you already have a Dashlane account, log in using your credentials.
- If not, click on the “Create an account” button.
- Fill out the registration form in the new window, providing your email address and a strong password.
- Confirm the password and click the “Create my account” button.
- Your Dashlane account will be created, and you will be automatically signed in to both the account and the Dashlane extension.
Save and Sync Passwords:
- Use your browser normally, and Dashlane will prompt you to save passwords for visited websites.
- Dashlane will also offer to auto-fill saved passwords when you revisit those sites.
- To sync passwords across devices, install Dashlane and log in with your account on other devices.
How To Log In To Dashlane?
If you are logging in to Dashlane on a new device or after reinstalling the app, you will need to follow some additional steps:
Download and install the Dashlane app on your device:
To use Dashlane, you’ll need to first download and install the app on your device. The app is available for Windows, Mac, iOS, and Android, and can be downloaded from the Dashlane website or your device’s app store.
Open the app and click on “Log In” on the welcome screen:
Once you have installed the app, open it and you should see a welcome screen with the options to “Log In” or “Create Account”. Click on “Log In” if you already have a Dashlane account.
Enter your Dashlane email and Master Password, and click “Log In”:
On the next screen, enter the email address associated with your Dashlane account and your Master Password. Your Master Password is the main password that unlocks your Dashlane vault, so make sure you enter it correctly. Then, click on “Log In” to continue.
If you have enabled two-factor authentication, enter the code that was sent to your authenticator app or device:
If you have enabled two-factor authentication for your Dashlane account, you will be prompted to enter a code that was sent to your authenticator app or device. This is an extra layer of security to ensure that only you can access your account.
Verify your account (if logging in on a new device or after reinstalling the app):
If you are logging in to Dashlane on a new device or after reinstalling the app, Dashlane will send you an email with a verification link. Click on the link to verify your account and complete the login process.
Once you have successfully logged in, you should see your Dashlane vault and all your stored passwords and other secure information:
If you have followed the above steps correctly, you should now be logged in to your Dashlane account and able to access all your stored passwords, payment information, and other secure data. From here, you can start using Dashlane to autofill login credentials, generate new passwords, and manage your online security.
Top Dashlane Alternatives
Here are some of the top alternatives to Dashlane Password Manager:
|
PARAMETERS |
DASHLANE PASSWORD GENERATOR |
NORTON PASSWORD MANAGER |
BITWARDEN |
|
Cost |
$40 per month + per person rate based on plan |
$0 |
$0 to $5 per month, per user |
|
Free Trial |
30 days for Personal plans and 14 days for Business plans |
– |
7 Day |
|
Zero Knowledge Security Architecture |
Yes |
Yes |
Yes |
|
Two-Factor Authentication |
Yes |
Yes |
Yes |
|
Autofill Web Forms |
Yes |
Yes |
Yes |
|
Biometric Functionality |
Yes |
Yes |
Yes |
|
Mobile PIN Unlock |
Yes |
Yes |
Yes |
Norton Password Manager
It offers password generation, autofill, and biometric authentication. It also includes a digital wallet for securely storing credit card information and payment details. However, it is only available to Norton 360 customers and has received mixed reviews regarding its user interface and ease of use.
Bitwarden
It is a free and open-source password manager that offers password generation, autofill, and secure password sharing. It includes advanced security features like two-factor authentication and end-to-end encryption. Bitwarden has a clean and easy-to-use interface, and is regularly updated. Overall, it is a great choice for those looking for a free and open-source password manager.
How To Reset The Dashlane Master Password?
Dashlane prioritizes your data security and privacy. We adhere to a strict policy of not storing or sharing your Master Password, making it impossible for us to retrieve or reset it for you. Unlike other apps, Dashlane does not have a conventional “reset password” process. This approach is designed to maximize the protection of your personal information and maintain the highest level of confidentiality.
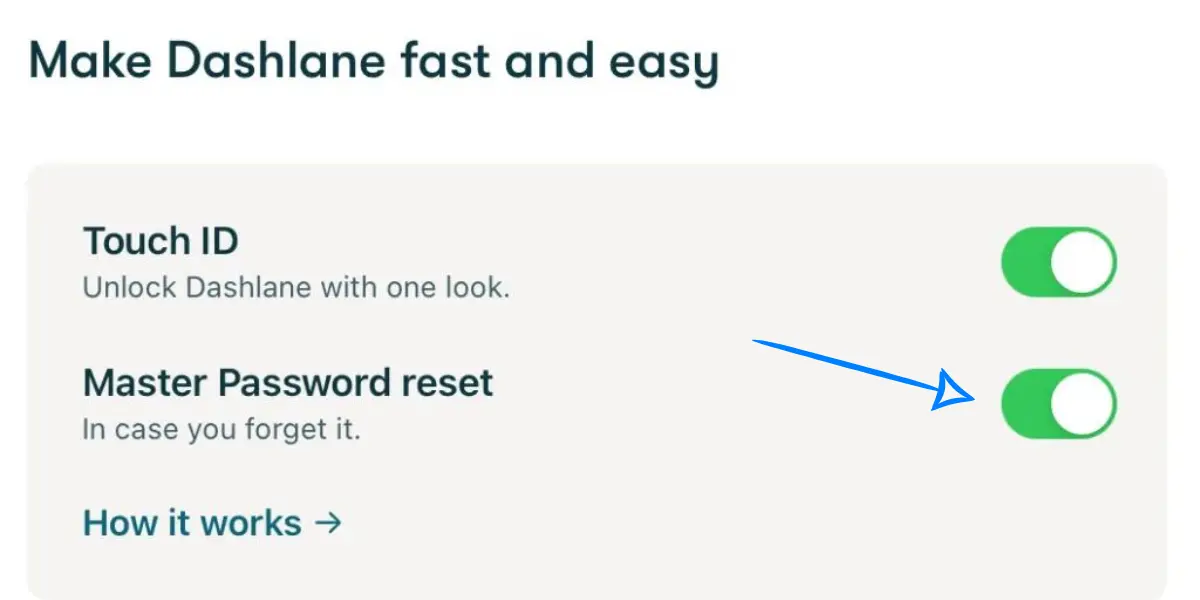
However, if you still want to recover your password you may require resetting your Dashlane account, resulting in the loss of all saved data. To prevent data loss, explore the suggestions provided before opting for an account reset.
- Try To Login Again
Firstly make sure that you have entered the correct email address for the Dashlane account. Check for any typos or extra added space in the email address. Once confirmed, enter your master password and check it for any errors. It might help in some situations.
- Recover The Account Without Loss Of Data
There are two ways for you to securely recover your password without losing your data: Biometric Recovery or Admin assisted recovery (business plan). If you have not used these options previously then there are chances that you may recover your Master Password.
If none of the above options work out for you, then you may have to reset your account. But make sure to keep a unique and memorable Master Password after you try to login again.
How do I Import Data Into Dashlane?

Step 1 – Export Your Data
You may first need to export your data from password manager or browsers to a CSV file. These files store login information and secure notes. On the other hand, files you export from the browser have login info only.
Step 2 – Import Your Data
You can import your CSV files to Dashlane using either from both web and Android apps. Currently, you can’t import data with the CSV file using your iOS device or Safari apps.
For Web:
- Access the Dashlane web app and navigate to the “My account” menu.
- Select “Settings” and then choose “Import data.”
- In the “Import source” section, specify the origin of your exported file or select “Other CSV,” and click on “Get started.”
- Drag the file from your computer and drop it into the designated area, or use the “browse your computer files” option to locate the file on your desktop. Once selected, click “Next” to preview the file within Dashlane. For Starter, Team, or Business plans, you will be prompted to select whether to import the data to your Personal or Business Space. Make your selection and click “Next.”
- Review the imported data. You can adjust the categorization of items by assigning them to either “Logins” or “Secure Notes,” or choose “Do not import” for certain items. For Starter, Team, or Business plans, you can also determine if an item should be placed in your Personal or Business Space.
- When you are satisfied with the review, click “Import items.” A confirmation message will appear, indicating the number of imported items.
For Android:
- Open the Dashlane app on your Android device.
- Tap on the “+” button and choose “Logins.”
- Select “Want to import multiple passwords?” and then tap on “From a CSV file” followed by “Select file.”
- Locate and select the CSV file on your device. You may be required to enter your Master Password or unlock Dashlane using your face or fingerprint.
- If prompted, a pop-up labeled “Let’s match your file” will appear. Tap on “Start matching” and proceed to identify the data in the CSV file, such as Website or app, Username or email, Password, or Other. Then tap “Next.”
- Review the imported data. To exclude specific items from the import, uncheck their checkboxes. Once ready, tap on “Import.”
How to Generate or Change Password on Dashlane?
Generating and changing passwords on Dashlane is a simple yet effective process for bolstering online security. To generate a password, access Dashlane’s password generator feature, which creates strong, unique passwords tailored to your specifications.
Customize the length, character types, and any specific requirements. Once generated, the password is securely stored within Dashlane for automatic filling during login. Changing a password is equally straightforward.
Within Dashlane, navigate to the desired account’s details, click on the password field, and choose the “Generate New Password” option. Save the updated password within Dashlane, ensuring seamless password management and enhanced protection against unauthorized access.
Dashlane Darkweb scan
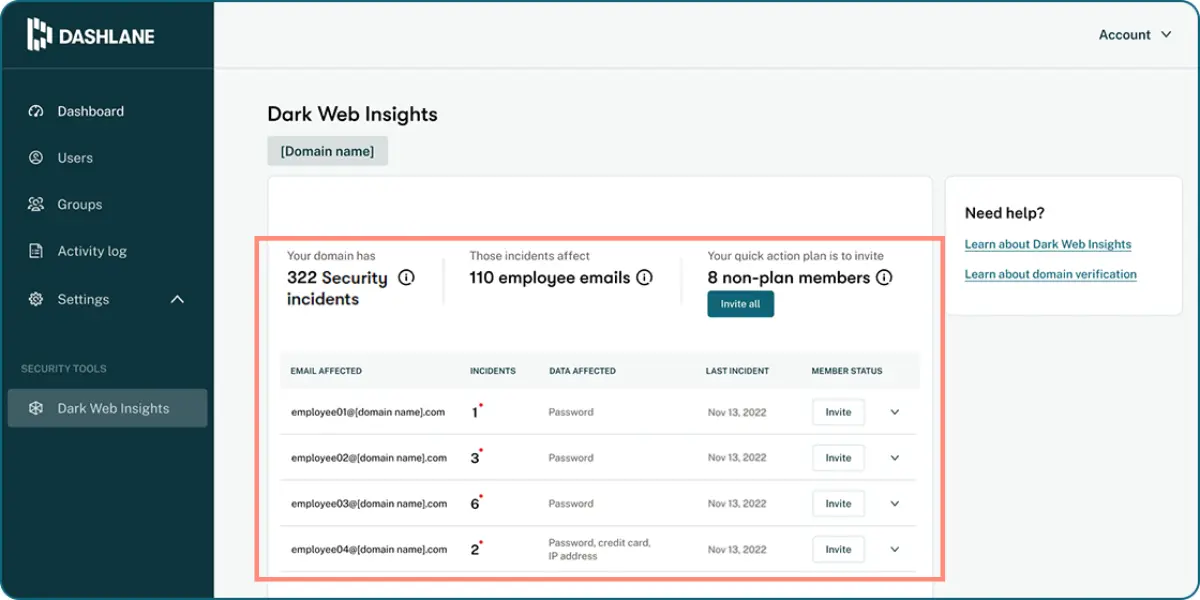
Dashlane leverages SpyCloud’s licensed dark web data to proactively monitor stolen login credentials used by hackers. Your personal information is never shared with SpyCloud. By adding your email addresses to the Identity Dashboard, Dashlane initiates a verification process and conducts a swift scan of available data. The results are presented in a web page list and detailed alerts within Dashlane.
During testing, no alerts were found for the provided email account. Alerts can be resolved by updating compromised passwords or discarding them. It’s advisable to add all your email addresses for ongoing monitoring as Dashlane continuously checks against new dark web data. This feature significantly enhances security.
How to use Dashlane emergency password access?
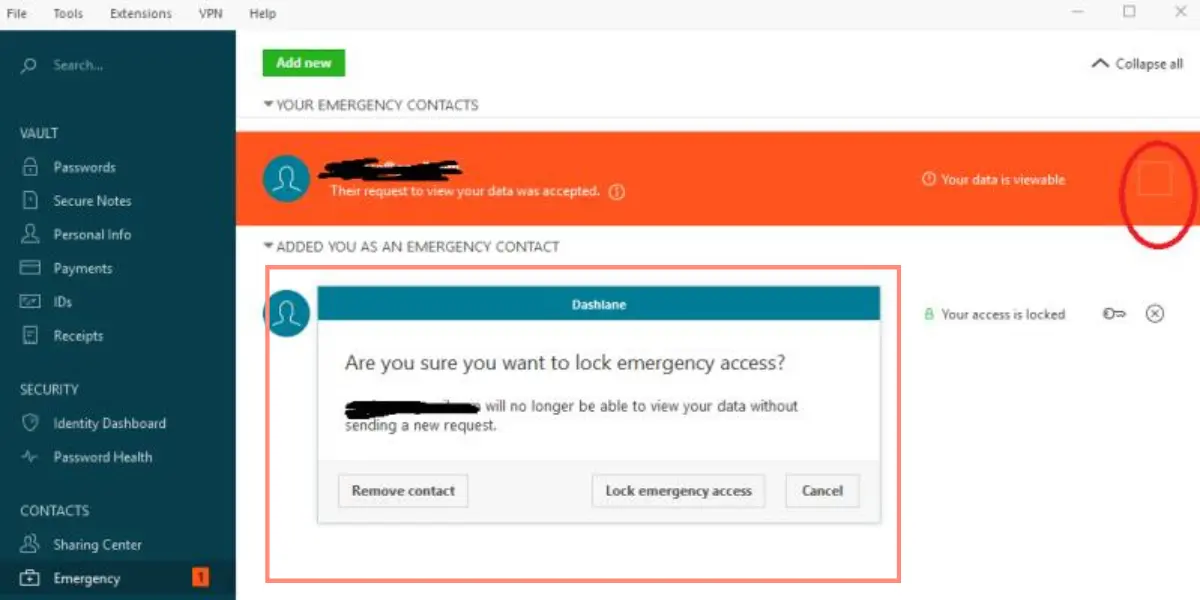
Dashlane’s emergency contact feature ensures a smooth transfer of your digital legacy without the need for probate. It’s as easy as sharing one password, with one crucial difference: you can set a waiting period before granting full access. If your designated heir attempts to access your credentials while you’re still alive, you can simply deny access through a notification email.
To set up an Emergency Contact, open the Dashlane desktop app, go to the Emergency tab, click Add New, enter the recipient’s email, select the desired accounts for access, and specify the waiting period. Optionally, you can require explicit permission for access, but this carries the risk of being unable to grant it in the event of unexpected demise.
Dashlane Password Manager Support
As a user-focused platform, Dashlane offers a range of professional and relevant support channels to assist users in managing their passwords securely and efficiently. Let’s have a look
- Articles:
Explore our comprehensive collection of articles to gain valuable insights and optimize your experience with Dashlane Password Manager. Our well-crafted articles cover everything from getting started to advanced tips and tricks, ensuring you can easily navigate and master the full potential of our powerful password management solution.
- Live Chat Support:
Connect with our friendly and knowledgeable support team in real-time through our Live Chat feature. Whether you have questions, need assistance, or seek guidance on any aspect of Dashlane, our skilled representatives are here to provide immediate help, ensuring a seamless and efficient resolution to all your queries.
- Email:
Should you prefer a more traditional means of communication, our Email Support is just a message away. Share your concerns or inquiries with us at your convenience, and our dedicated support staff will promptly respond, addressing your specific needs with utmost care and precision.
- Call Support:
For personalized assistance, our Call Support is at your service. Reach out to us via phone, and our experts will attentively listen to your requirements, offering expert advice and support to resolve any issues you encounter while using Dashlane.
- Social Media Support:
Stay connected and engaged through our Social Media channels. Reach out to us on platforms like Facebook, Twitter, or Instagram, where we actively interact with our community. Share your feedback, seek assistance, or find the latest updates on Dashlane to enhance your password management experience.
- Self-Service Support:
Empower yourself with our comprehensive Self-Service Support resources. Access our knowledge base, FAQs, and troubleshooting guides to find quick solutions and learn valuable tips to optimize your usage of Dashlane independently and efficiently.
Is Dashlane Password Manager Right For Your Business?
Are you tired of constantly resetting passwords and worrying about data breaches? Dashlane Password Manager might be the solution you’ve been searching for. With its powerful password generator, secure storage, and easy-to-use interface, Dashlane can help your business stay secure and organized.
One of the biggest advantages of Dashlane is its multi-device support, which means you can access your passwords from anywhere. Its two-factor authentication, failsafe function, and security audits ensure that your data is safe and protected at all times.
In terms of pricing, Dashlane offers both individual and business plans, making it a flexible option for businesses of all sizes. And with its admin management feature, you can easily manage and control access to your team’s passwords.
While there are other password managers on the market, Dashlane’s combination of powerful features and ease-of-use make it a top contender for businesses looking to enhance their cybersecurity practices. So if you’re ready to take your business’s security to the next level, Dashlane is definitely worth considering.
Conclusion
Overall, Dashlane is a powerful and feature-rich password manager that offers a range of benefits for both individuals and businesses. Its password generator, autofill, and multi-device support make it a convenient option for managing and securing passwords, while its advanced security features like two-factor authentication and failsafe function ensure that your data is protected at all times.
Additionally, Dashlane’s pricing options and admin management feature make it a flexible solution for businesses of all sizes. While there are some minor drawbacks, such as the lack of a free version and occasional syncing issues, the benefits of Dashlane far outweigh any potential downsides.
Overall, Dashlane is a great choice for anyone looking for a comprehensive and user-friendly password manager. Its combination of ease-of-use, security, and convenience make it a top pick in the crowded password manager market.
Frequently Asked Questions
-
Is Dashlane A Good Password Manager?
Yes, Dashlane is a good password manager. It offers a range of features like password generation, autofill, and multi-device support, as well as advanced security features like two-factor authentication and failsafe function. While it’s not perfect and has some minor drawbacks, the benefits of using Dashlane make it a top pick in the crowded password manager market.
-
How To Add Dashlane Extension To Chrome?
To add the Dashlane extension to Chrome, go to the Chrome Web Store and search for “Dashlane Password Manager”. Click “Add to Chrome” and follow the prompts to install the extension. Once installed, you can access Dashlane by clicking on the Dashlane icon in the top right corner of your Chrome browser.
-
Why Do I Need A Password Manager?
You need a password manager to help you create strong and unique passwords for all of your online accounts, as well as to store and manage those passwords securely. Password managers also make it easy to autofill login information and can help protect against phishing and other types of cyber attacks. Ultimately, using a password manager can save you time, protect your sensitive information, and improve your overall online security.
-
What’s The Easiest Password Manager To Use?
The easiest password manager to use largely depends on personal preference, but some popular options known for their user-friendly interfaces include Dashlane, Norton, and 1Password. These password managers offer features like autofill, password generation, and syncing across multiple devices, making it easy to manage and secure your passwords. It’s best to try out a few options and choose the one that feels the most intuitive and easy to use for you.
-
How Much Does Dashlane Cost?
Dashlane offers a free version with basic password management features, but for more advanced features like VPN and dark web monitoring, you will need to upgrade to a paid plan. Dashlane’s paid plans include Premium for $3.99/month and Family for $7.49/month (billed annually). There is also a Business plan available for teams, with pricing varying based on the number of users and specific needs of the organization.
-
Could Someone Hack Into My Dashlane Account?
It is unlikely that someone could hack into your Dashlane account if you are using strong passwords and two-factor authentication. However, as with any online service, there is always some level of risk. It’s important to take steps to protect your account, such as using a strong, unique master password and enabling two-factor authentication.

Editorial Board
Updated on 11 Jul 2024About The Author

Proactive Protection for Your Digital Life!
- $1,000,000 ID Theft Insurance
- 24/7/365 Customer Support
- 60-Day Money-back Guarantee
Features
- Active Discount Coupon. Found on the Internet
- Average score
- Autosave & Autofill passwords
- Autofill personal data
- Data breach alert
- Secure notes
- Free version
- Multi-factor Authentication (MFA)
- Secure Credit Card
- Password generator
- Easy organization
- Attach files to items
- Subscription includes Antivirus
- Devices
- Compatible for all devices
- Browser extension
- Password sync across all devices
- Password sharing (passkeys)
- Offline access
- Mobile access
- Family Plan (members)
- Premium trial
- Subscription includes VPN
- 24/7 support
- Encryption type


